HireBee creates the perfect platform to connect employers with freelancers looking for work.
HireBee is a popular application theme that allows employers to post projects that will appeal to potential freelancers. The admin of the site can then charge employers to advertise in return for a percentage of each project listed.
Setup and Usage Video Tutorial
After Installation
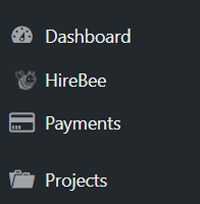
Once you have installed and activate ‘HireBee’, three menus will appear on your admin dashboard. These will be titled: HireBee, Payments and Projects. These three menus make up the foundation of this AppTheme and will be your go-to menus for configuring settings, accepting payments and viewing/adding projects.
Step 1) General WordPress Settings
Most settings can be left as default. You will need to enter in your payment details to start receiving money for adds posted and configure some general settings to suit the website you are creating/operating. Below are the basic settings you should configure before continuing.
To allow users to come to your website and register for an account (which they can then use to post ads) you will need to enable membership settings. Enable this if you are creating/editing a website where you want outside users to be able to register.
- Go to your WP settings.
- Under the ‘General Settings’ tab you will see a box next to ‘Membership’. Ticking this box will allow anyone to sign up to your site.

Step 2) Basic HireBee Settings
Before creating a project you will need to configure HireBee Settings to suit your website. Under the HireBee settings menu you will find the following tabs: general, categories, notifications, projects, proposals, users, geolocation and security. We recommend having a look through each tab to familiarise yourself with this AppTheme. (Click here for detailed HireBee settings configuration)
General Tab
- Under the ‘General’ tab is where you are able to link any related social media sites. Simply copy the URL of your social media and paste it in the appropriate field.
- You will need to tick the ‘Share Roles Capabilities’ box to allow users to be both employers and freelancers. If you do not select this box, your user will only be able to be an employer or freelancer- not both.
Projects Tab
- If you would like to review projects before they go live you will need to tick the ‘Projects’ checkbox. This allows admin full control of the content on their site.
- Under the projects tab is also where you are able to customize the number of projects visible on the front page of your site, the number of skills required for each project and select a required budget for each job listed.
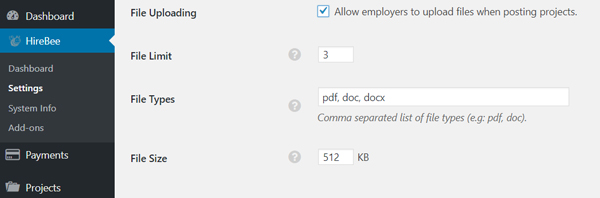
- Under the ‘Attachments’ heading within the ‘Projects’ tab, you will need to enable the file uploading option if you want to allow employers to upload files. Employers may wish to upload an example of the task etc.
- You may choose to set a duration for free ads
- Under the ‘pricing’ section, you will need to select the ‘Charge for Projects’ box, if you wish to charge employers to list adds on your site.
Users Tab
- Configure how many user profiles you would like to show on each page
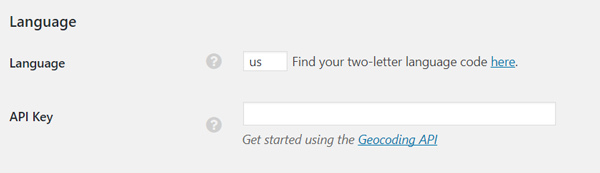
Geolocation Tab
- Set your choice of language
- Set up google maps by entering in your unique API key (see more information on API key here)
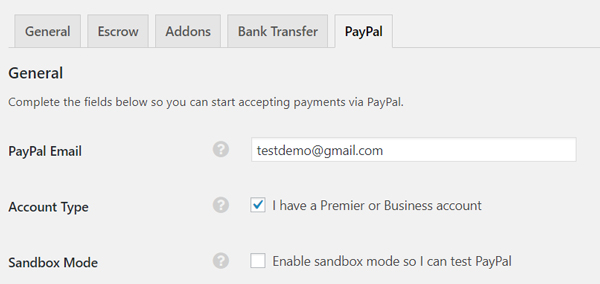
Step 3) HireBee Payment Settings
- Choose the currency you would like to accept from the drop down menu.
- Enter in a tax rate (if applicable)
- Choose a payment gateway– bank transfer or PayPal. Some users choose to use both.
- If you choose to use PayPal as your payment gateway, enter in your account details under the ‘PayPal’ tab under the ‘Payments’ menu. This will include your PayPal email address as well as PDT and IPN (if applicable).
Step 4) Editing Featured Images on Front Page and Blog Page
- Click on your websites ‘Pages’ menu. You will see two pages titled: ‘Blog- Front Page’ and ‘Blog- Posts Page’.
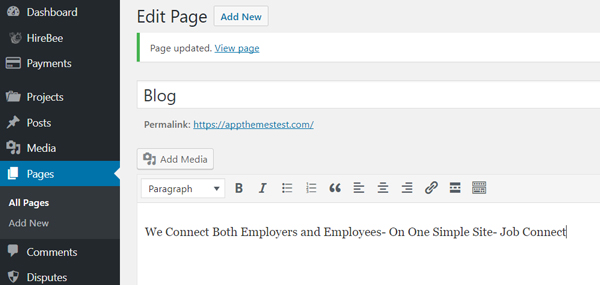
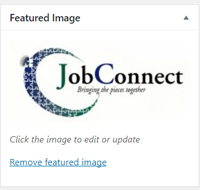
- Editing the text in the ‘Blog- Front Page’ will change the text featured towards the top of your websites home page. You can also add a feature image to this page, which will appear behind any text you enter.
- You can edit the featured image that appears on your websites blog page by clicking on ‘Blog- Posts Page’ in the pages menu. You will see a menu on the right hand side that has a ‘set featured image’ option. This is where you can upload an image to feature towards the top of the blog.
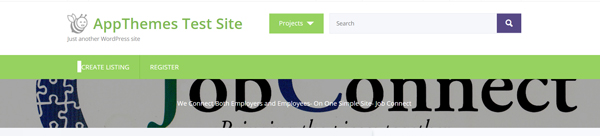
Example: Editing the featured image and text on the website home page
Example: After editing the front page featured text and image
Step 5) Create Your First Project from the Admin Dashboard
Once you have configured your general settings, you are ready to create your first project.
- Click on the ‘Projects’ menu and then the ‘Add New’ button.
- Give your project a title and a description. You may also choose to add an image in the text field.
- Add any media documents (these may include images of a similar tasks in which you would like to complete).
- Enter in the budget for your project. This will be the amount you will pay a successful freelancer. This amount can be a lump sum or paid per hour.
- Enter in how many days you would like to show this advertisement for.
Example: A completed advertisement created by admin

Optional: Customizing the Color of your Website
Customizing the color of your website allows it to stand out amongst other sites that may be similar (find out more on appearance here).
- Click on the ‘Appearance’ menu in your admin dashboard and then click ‘Customize’.
- Click the ‘Colors’ tab. This will give you the option of multiple color schemes and the choice of a background color.
Example: For this website I have used the default color scheme and a black background

Like this tutorial? Subscribe and get the latest tutorials delivered straight to your inbox or feed reader.