The LinkShare plugin allows you to automatically import LinkShare coupon and promotion data into your Clipper site.
LinkShare Preparation
To use the LinkShare plugin you must have a LinkShare publisher account. You can sign up for a free LinkShare publisher account here.
Obtaining a Token Key
You will need to obtain a LinkShare token key to allow Clipper to access the LinkShare API. To get a token key, login into your LinkShare account, then go to “Links > Web Services”, you find it in “Your Web Services Token” box, if it’s not yet there, click the “Create Token” button.

Joining Affiliate Programs
This step is pretty important. To receive commissions for promoting deals on your site, you will need to sign up for affiliate programs offered by merchants.
To apply to individual affiliate programs, choose “Programs” from menu. You will be presented with a page of advertiser categories. Choose any category to see a list of stores. Click the check box next to the stores you wish to join then click the “Apply” button at the top or bottom of the list. Please note that it may take a few days for some advertisers to accept your application.
You’re now ready to set up the plugin within your Clipper install.
Setting Up the Plugin
At this point we assume that you have created LinkShare publisher account, created a website profile, obtained a token key and signed up for various advertiser programs. If you have not done so, please follow the steps above.
Installing the plugin
You can obtain the necessary plugin files in your AppThemes customer dashboard. In the dashboard, click “Purchases” in the right sidebar and then look for the plugin files under the heading “Marketplace Purchases”. Click the link under the plugin name and save the ZIP file to your computer.
In the WordPress admin of your site, go to Plugins > Add New. Click the “Upload” link at the top of the page and use the upload form to find the files on your computer (you saved these files to your computer in the previous step). Click the “Install Now” button, then click “Activate Plugin”.
You’re now ready to add the settings to the LinkShare plugin.
LinkShare Plugin Settings
After plugin activation, go to Clipper > LinkShare to find the LinkShare settings page, like the one in the screenshot below.
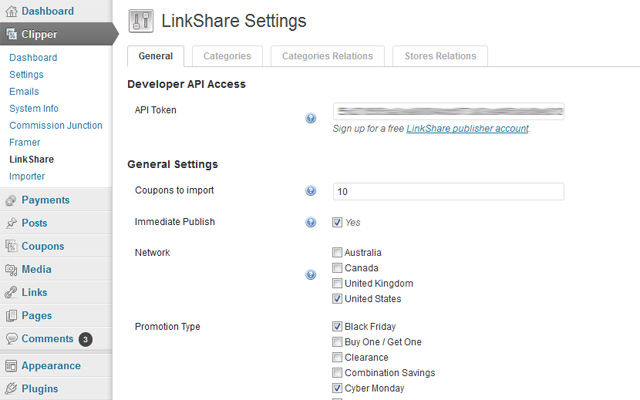
Developer API Access
Enter the “Token key” that you obtained from LinkShare (Links > Web Services).
General Settings
- Coupons to import – Specifies how many coupons should be imported at one time.
- Immediate Publish – Let’s you choose status of imported coupons. If not checked, then all imported coupons will be marked as Pending Review, and you need to publish each of them separately after reviewing.
- Networks – Defines the networks of the coupons that will be imported to your site. You may choose more than one. Leave unchecked to import from all.
- Promotion Type – Defines the promotion type of the coupons that will be imported to your site. You may choose more than one. Leave unchecked to import from all.
- Create Category – Creates a category if one does not exist yet. See instructions for the “Merchants & Categories relations” tab below.
- Create Store – Creates a store if one does not exist yet. See instructions for “Merchants & Categories relations” tab below.
- Schedule Posting – Specifies how often coupons should be imported.
One Time Actions
Allows you to run a one time, immediate coupon import.
Categories tab
On this page you can choose the categories of the promotional offers imported to your site. You may choose multiple categories. Leave unchecked to import from all.
Merchants & Categories relations tab
In this tab, you can assign categories and merchants supplied by LinkShare to the stores and categories created on your site. Under the General settings tab (as noted above), if “Create category” and “Create store” are left unchecked, all promotional offers that do not have a relation assigned here will be omitted. If you checked “Create category” and “Create store”, categories and stores will be automatically created and you do not need to worry about defining the relations.
After changing any settings, always make sure to click the “Save Changes” button.
Like this tutorial? Subscribe and get the latest tutorials delivered straight to your inbox or feed reader.