So you’ve gone through part one of Setting Up Payments in JobRoller. You made changes to the job listings settings and set up the options in payments settings. Let’s create some pricing plans!
Create Your First Pricing Plan
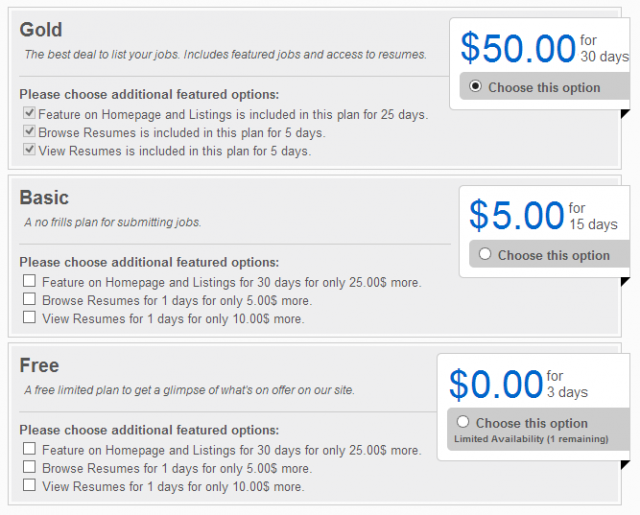
In order to accept payments for job listings, you must create a pricing plan in JobRoller and assign the plan to job categories. We’ll do that now. But before we do, it’s helpful to see how the pricing plans will look to your customers. You can see that in the screenshot below.
For this tutorial, we’ll create ‘Single’ price plans. If you need to create a ‘Pack’ plan please read our tutorial on creating Pack plans.
Let’s create the pricing plans in the screenshot above. We’ll start with the “Basic” plan. In the WordPress admin, navigate to Payments > Plans. On the “Job Plans” page, click the “Add New” button at the top of the page. You should see the page below.
Plan Name
This will be the name of your pricing plan. You can use names that will help you keep track of your plans but you should remember that your customers will also see the pricing plan name when they buy a job listing. You want keep that in mind. To match our example, we’ll add “Basic” here.
Description
This section allows you the opportunity to give a little more details to your customers about the pricing plan. You can also use the description to “sell” the plan. For this section, we’ll add “A no frills plan for submitting jobs.”
Price
Simple enough, this is the price that your customer will pay with this plan. Let’s charge $5 for our “Basic” price plan.
Relist Price
This field will only be available if you have relisting enabled on your site. It’s the price that your customer will pay with this plan when relisting a job. We’ll charge the same $5 for relisting with our “Basic” price plan. You can set it to 0 to offer relistings.
Job Duration
This setting determines how long a job is displayed before it expires. Duration is always denoted in days. If you want job listings to last a month, add 30 or 31 days. For a year, enter 365 days. If you do not want listings to expire, put zero. When it comes to listing duration, zero equals infinity. For our example, let’s use 15 days.
It’s important to remember that job listing duration and addons durations are not the same. We’ll get into that a little more in a few moments.
Usage Limit
This setting determines the number of times the plan is selectable by the same user. Setting a value greater then 0 will limit the times the plan can be selected. After a user reaches the limit, the plan will be hidden from selection. For the “Basic” plan we’ll set it to 0, so the plan can be selected unlimited times.
Important Note: Usage limits can be reset by an admin on each user profile under ‘Reset Usage’. After resetting the usage limit, the plan will be available for selection again.
Featured Add-ons
This section gives you the opportunity to include featured status as a part of the pricing plan. Let’s look at the options a little more closely.
In the “Featured Add-ons” panel, you will see check boxes marked “Included” next to “Feature on Category” and “Feature on Homepage and Listings”. Checking a box means the featured option will be included as a part of this pricing plan. Leaving it unchecked means that featured is not included in the pricing plan and must be purchased separately.
If you decide to include featured with the pricing plan, you need to set duration for featured status. This determines how long the job listing will remain featured as a part of this pricing plan. The duration is denoted in days. The duration can be any amount but must be the same or shorter than the job listing duration.
There is a lot more to featured and we’ll take a closer look later in this tutorial. For our “Basic” pricing plan, we will not enable featured.
Resumes Add-ons
This section gives you the opportunity to give temporary access to resumes as a part of the pricing plan. Let’s look at the options a little more closely.
In the “Resumes Add-ons” panel, you will see check boxes marked “Included” next to “Browse Resumes” and “View Resumes”. Checking a box means the resumes temporary access (view or/and browse) will be included as a part of this pricing plan. Leaving it unchecked means that resumes temporary access (view or/and browse) is not included in the pricing plan and must be purchased separately.
If you decide to include resumes access with the pricing plan, you need to set their duration. This determines for how long the user can view or/and browse resumes as a part of this pricing plan. The duration is denoted in days. The duration can be any amount but must be the same or shorter than the job listing duration.
For our “Basic” pricing plan, we will not enable resumes addons.
Important notes:
- Resumes Addons are only available if your site requires an active subscription to browse/view resumes (JobRoller > Settings > Resumes).
- Once a user purchases or is offered a Resume addon he cannot choose it again until it expires. This allows for better monetization on your site as customers will need to submit jobs or purchase a subscription, to access resumes.
Job Categories
JobRoller allows you to assign pricing plans to job categories. You can assign multiple plans to one category, you can assign one plan to many categories or you can do anything in between. It’s very important to note, if a category does not have an associated pricing plan, users will be unable to purchase job listings in that category, unless categories are not required. That means, whenever you create a new category, you need to make sure you assign a pricing plan to the category.
To link categories to a pricing plan, simply check the categories you want in “Job Categories” in the sidebar.
For our example, we will choose all the available categories. Now we’re certain to have at least one pricing plan for everything on our site.
Once you have set your options and chosen the categories associated with the pricing plan, you can click the “Publish” button. Users can now purchase listings on your site using the “Basic” payment plan.
Important note: If you don’t have job categories set as required and the job is not assigned a category, the categories-plan relation will be ignored and all the plans will be available for selection independently of their category.
Order
The order, determines the position where the plan should be displayed. A plan with a lower value will display first. Let’s set our “Basic” plan to 2, to appear right after the “Gold” plan.
Closer Look at Featured
With options in two different places, featured job listings can get a little confusing. Using the examples in the screenshot at the top of this post, let’s look at featured listings in detail.
Featured not Included in Pricing Plan
In our “Basic” pricing plan that was created above, we opted to not include featured as part of the pricing plan. Here’s what that means to your customers when they buy a job listing.
If you do not have the featured addons listings enabled in the payment settings, then your customer will not get featured as part of the pricing plan and they will not have the option to pay for featured separately.
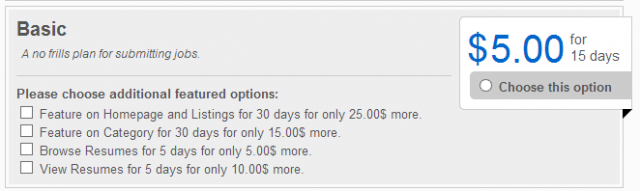
In the same example, let’s say you do have featured addons enabled in the payment settings. Featured addons would not be included in the “Basic” pricing but it could be purchased separately. In the screenshot below, you see that customers will be able to add featured at an extra cost.
Important note: The featured in category addon will only be available for selection or included in the plan if a job category was assigned to the job.
Addons Included in Pricing Plan
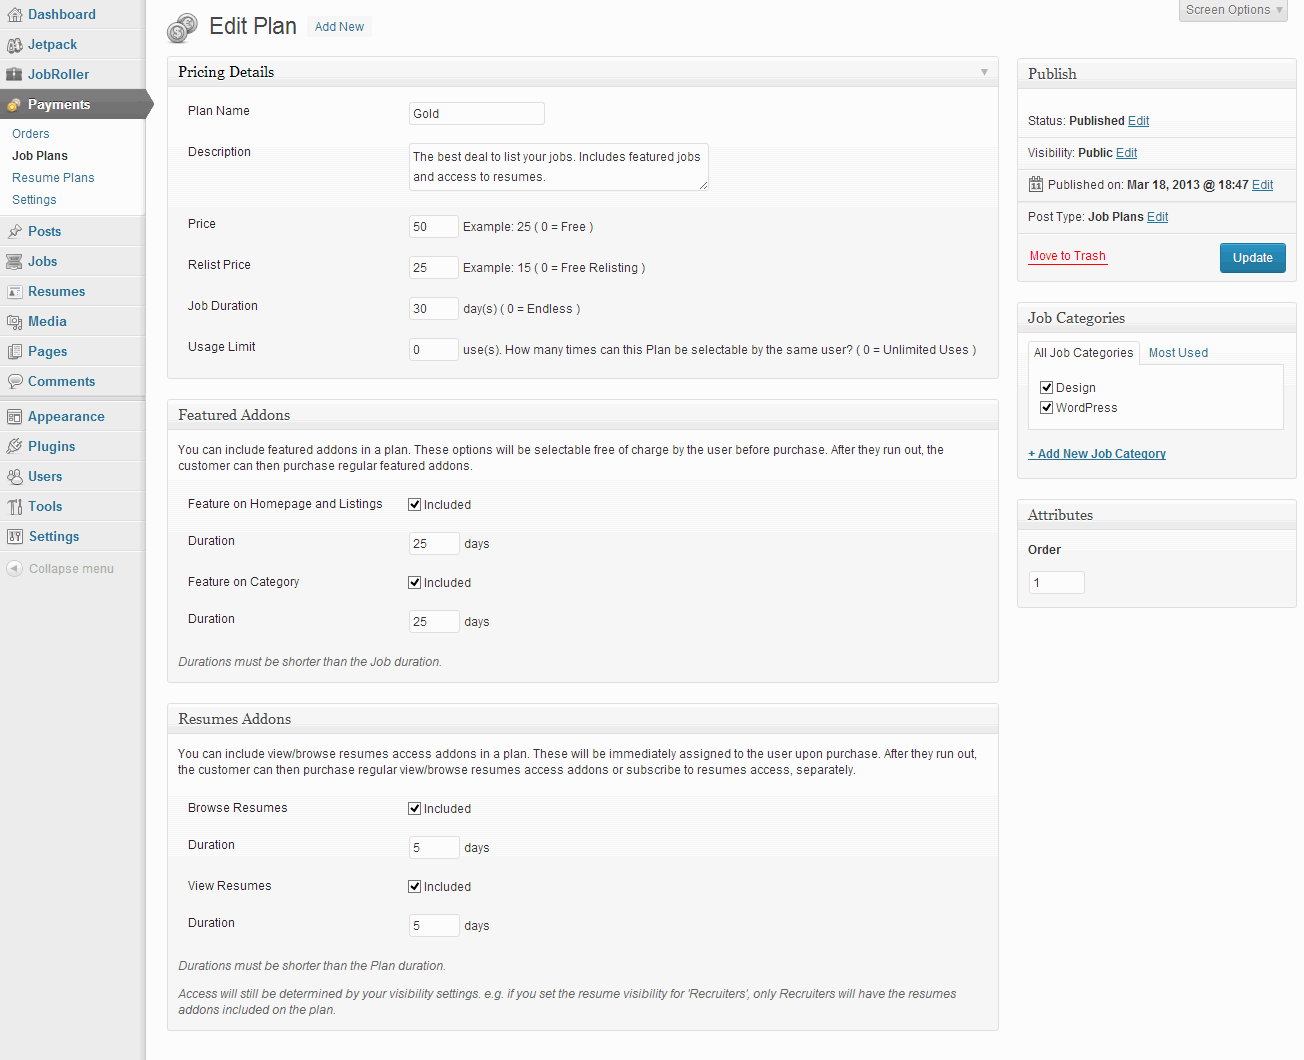
Now we’ll create another example pricing plan. We will create the “Gold” pricing plan shown in our original example screenshot. Here’s how it looks on the “Add New Plan” page.
This is going to be an expensive plan and we want give people incentive to choose this plan, so we’ll include featured and resumes addons, for 50$, and the job listing will be active for 30 days.
Promotional Plans
Promotional plans are a great way to engage your customers on your site and JobRoller helps you achieve it by giving you the option to create limited usage plans. These plans are limited in use and will be automatically hidden when the user reaches the selection limit. We’ll create a Free plan trial plan to exemplify a promotional plan by setting the price to 0 and the usage limit to 1. Customers will be able to purchase the plan for Free but only once. Here’s how it looks on the “Add New Plan” page.
Here’s the screenshot with all the plans again.
Relisting Jobs
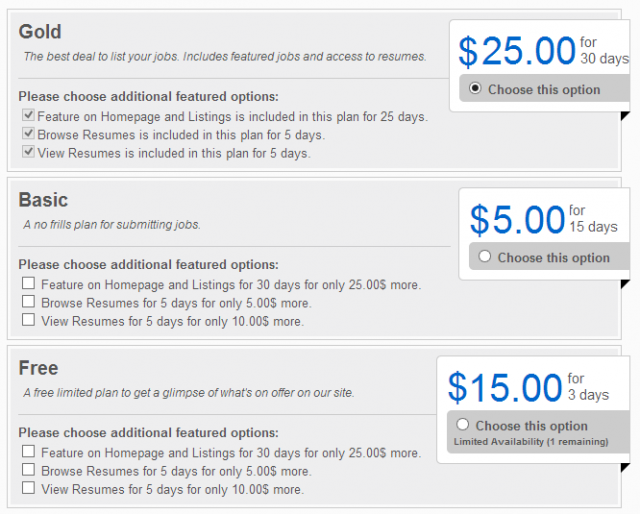
If your site is configured to enable relisting jobs, you can set a different price for the relisted job. Here’s how our plans price would display with the relist price set on our example plans.
Conclusion
Now that you learned how to set up payments in the first part of this tutorial and you have created some pricing plans after reading this part of the tutorial, you should be ready to offer the best pricing model for your site.
Like this tutorial? Subscribe and get the latest tutorials delivered straight to your inbox or feed reader.