Like most of our application themes, JobRoller allows you to charge for jobs posted to your site. With single or pack pricing plans, and lots of other pricing options, JobRoller gives you the power to create the pricing model that works best for you and your customers.
Once finished, your site will be ready to take payments from customers that want to list jobs on your JobRoller site.
Getting started
To begin, you will need JobRoller – version 1.7 or newer – and WordPress installed on a hosting server. You will also want to read the “Getting Started with JobRoller” doc to get ready.
In order to accept payments on your site, you will need to sign up with a payment gateway service. You will also need payment gateway software to complete transactions (PayPal is included with JobRoller).
JobRoller comes with PayPal and Bank Transfer as the default payment gateways. It’s free to sign up with PayPal and it is accepted in many countries around the world. If possible, we recommend starting with PayPal. You can sign up for an account at the PayPal website.
If you prefer not to work with PayPal or cannot get a PayPal account, other gateways are available in the AppThemes Marketplace. You can research and decide which is the best option for you.
Once you have JobRoller added to WordPress and an account with a payment gateway, you’re ready to proceed.
Charge for Job Listings
If you are going to charge for jobs, you want to enable the related option in JobRoller. The default setting for this is “No”, you should go to the settings page to enable it.
In your WordPress admin, go to JobRoller > Settings > Jobs. You should see the admin panel pictured below.
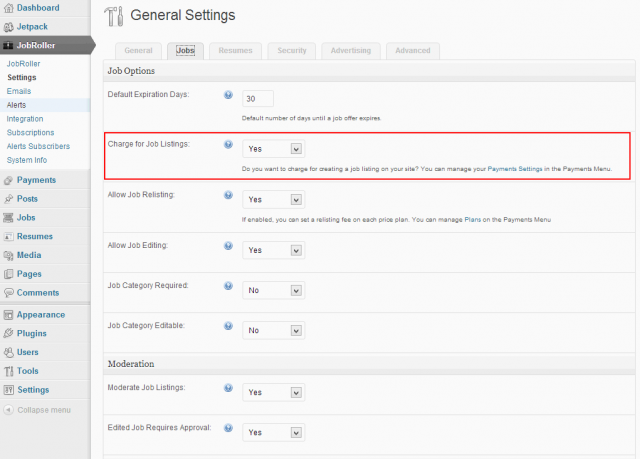
“Moderate Job Listings” and “Edited Job Requires Approval” are options worth mentioning here. If you want to review all new jobs before they are shown to the public, you will want to make sure these options are checked. Leaving the options unchecked means that all new/edited jobs will become public immediately after they are created/edited. The choice is up to you.
Important note: Paid jobs ignore the moderation options and will always be immediately published.

Payments Settings
JobRoller needs to know a few things about how you will charge for jobs on your site. To set up these options, go to Payments > Settings > General tab. You should see something similar to the screenshot below.
Important note: when you make any changes on this tab, you should press the “Save Changes” button before you navigate to another tab or page.
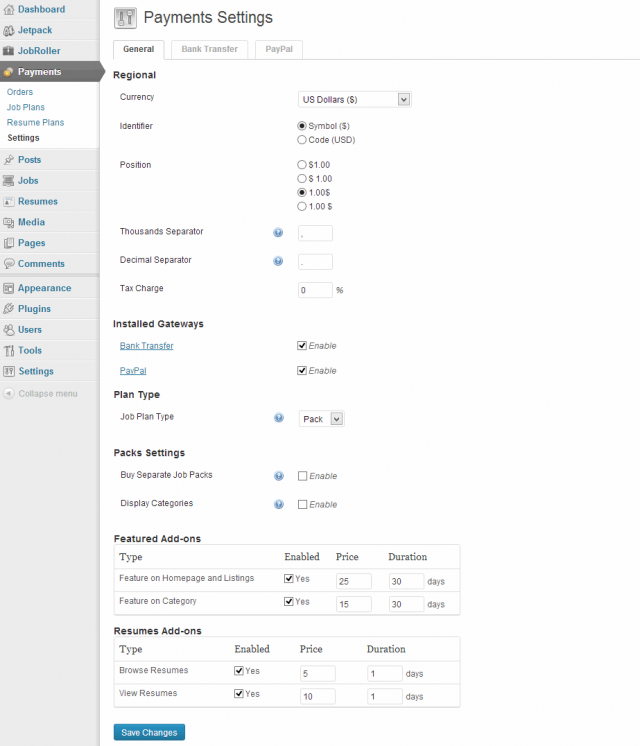
Regional
JobRoller allows you to choose the currency used to collect payments on your site. At present, you can only have one currency at a time. Click the drop down next to “Currency Selection” to select your preference.
Since PayPal is bundled with JobRoller, the default currencies are the currencies supported by that payment gateway. If you have added other payment gateways, you should see the currency options for the currencies supported by each gateway.
Below the currency selection you will find more options like:
- Identifier – allows you to choose between currency symbol and code
- Position – determine where the identifier should be displayed
- Thousands Separator – change to meet your regional price formatting
- Decimal Sepatator – change to meet your regional price formatting
- Tax Charge – allows you to add regional taxes to the final price
Plan Types
JobRoller supports two plan types. Both plan types offer slightly different options when you’re setting you job plans. You can read more on setting up both types of pricing plans by following the related tutorial link, below.
- Single – Single plans are applied to every single job submitted on your site. Job listers will need to pay a pre-set price for each job they post. Read our tutorial on setting up Single pricing plans in JobRoller
- Pack – Pack plans can bundle a pre-set number of jobs. When customers purchase Packs they will be able to submit the number of jobs contained in the pack until the pack expires or after reaching the total jobs limit. Read our tutorial on setting up Pack plans in JobRoller

If you choose ‘Pack’, as your plan type, after saving the changes, you’ll see two additional options:
- Buy Separate Job Packs – Enables customers to purchase packs directly from their dashboard in addition to when submitting a job. It also allows site owners to enable the ‘Buy’ button on the Packs widget
- Display Categories – Enabling this option will display the job categories on each pack

Add-ons
This section primarily deals with settings for featured job listings and resumes access. You will have additional options for these addons in pricing plans, but these are the base options. Here, you can set the price and duration for Featured Addons (home page/listings and category) and Resumes Addons (browse/view resumes) *.
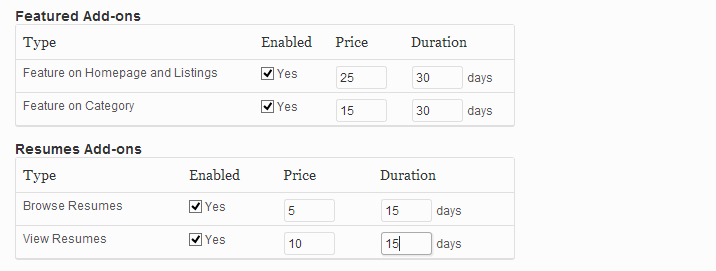
Featured Addons are applied to jobs, while Resumes Addons are applied to users.
For Featured Addons, duration determines the length of time that a job is a featured job. Duration is calculated in days. Enter the number of days you want the featured status on a listing to last. If you do not want featured status to expire, enter zero.
For Resumes Addons, duration determines the number of days that resumes remain accessible to a user. Duration is calculated in days. Enter the number of days allowed for users to browse/view resumes. If you do not want resumes access to expire, enter zero.
Price is the amount you want to charge for an addon. JobRoller only allows whole number values. For example, 12 is allowed but 12.99 or 12,99 are not allowed.
* Important note: Resumes Addons are only available if your site requires an active subscription to browse/view resumes (JobRoller > Settings > Resumes ).

When you have made all your preferred changes in the General tab of the payments settings section, clicking the “Save Changes” button implement your new settings.
Installed Gateways
This is where your installation of JobRoller may differ from the screenshot above. JobRoller will list, in this section, all of the installed payment gateways. If you have added more gateways, you will see them listed with “PayPal” and “Bank Transfer”.
To enable a payment gateway, simply check the “Enable” box to the right of that gateway. If you choose multiple payment gateways, JobRoller will allow your customers a single choice from the gateways you have enabled. With more than one enabled, you give your customers the ability to determine the gateway that works best for them.
Additional Payment Gateway Settings
You will notice in the payments settings section of the WordPress admin that there is a tab for each installed gateway. You can click each tab to see the settings for that gateway. Each payment gateway will have it’s own settings and options. You can follow the directions listed on the page or find instruction or tutorials elsewhere on our site.
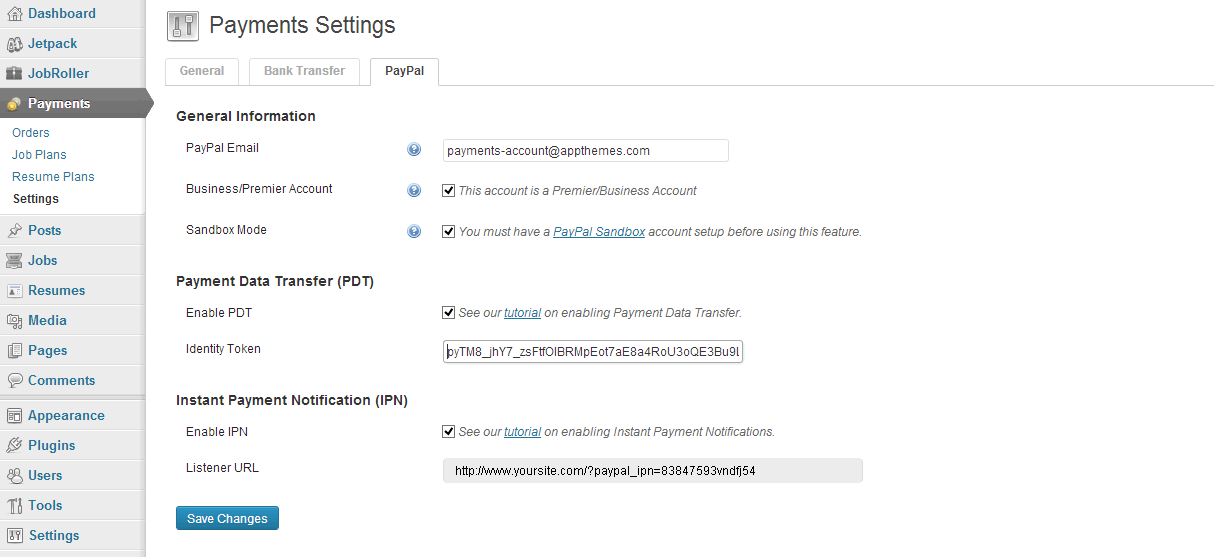
Since PayPal is the default gateway for JobRoller, we’ll take a look at those options and how to set them up. As mentioned before, you will need a PayPal account in order to use it as your payment gateway. You can create an account at the PayPal website.
PayPal Email – Add the email address used with your PayPal account here. Make sure it is entered correctly. If it is not exact, PayPal will not process your payments.
Business/Premier Account – Check this option if you have a premier/business account. This type of accounts allow customers to automatically process recurring payments via PayPal.
Important note: Recurring payments are only available for resumes subscriptions.
PayPal Sandbox – The sandbox feature allows you to test payments with your PayPal account. You can read all about PayPal sandbox here.
Enable PDT – PDT provides an extra layer of security to payment transactions on your site. AppThemes highly recommends that PDT is enabled for your site. To find out how to add PDT to your site, read our tutorial Enable PayPal PDT (Payment Data Transfer).
Enable IPN – IPN works by sending messages directly between PayPal and your site in the background. Using this channel of communication, your site can automatically update when orders complete. To find out how to enable IPN on your site, read our tutorial Enable PayPal IPN (Instant Payment Notifications).
Once you have added your payment gateway details, make sure to click the “Save Changes” button before moving on.
Part 2: Creating Pricing Plans
Now that you have edited the job listings and payments settings on your site, you’re ready to create pricing plans. Part two of this tutorial will show you how to create pricing plans for JobRoller.
Like this tutorial? Subscribe and get the latest tutorials delivered straight to your inbox or feed reader.