Previously, “Google” maps was the only option available that could be integrated with AppThemes. After feedback from our valued customers and the recent cost associated with Google maps, the AppThemes team has worked on adding additional Geo Services.
Each Geo Service is available as an addon extension. This allows you to set up maps on your AppThemes site with a Geo Service of your choosing.
Setting up maps
Depending on which AppTheme you are using, you will find the Geo Settings under the AppThemes main menu. It will appear as a stand alone menu titled ‘Geo Services’ (or similar).
General Settings
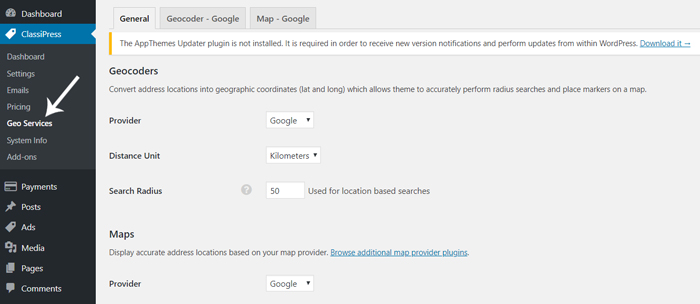
- Installed Geocoders: This option determines which “Geocoder” will be used for the AppTheme. A geocoder takes a given address and converts it to geographic coordinates. All available/installed geocoders will be listed in the “Geocoder” drop down box. Google is the default geocoder provided with the theme and the only option available without the addition of a plugin.
- Distance Unit: Allows you to select Kilometers or Miles as the desired unit of distance for your site.
- Default Standard Location Search Radius: Sets the default value for search radius when searching by location in the chosen AppTheme. For example, if a user searches for a Listing/Event in Toledo, Ohio, then the search result will display listings or events within 100 miles radius on Toledo. If the “Distance Unit” was set to kilometers, then the search radius would be 100km.
- Map Provider: This setting allows you to select the Map Provider used to display maps on your AppThemes site. Google Maps is the default Map Provider provided with the theme and the only option available without the addition of a plugin.
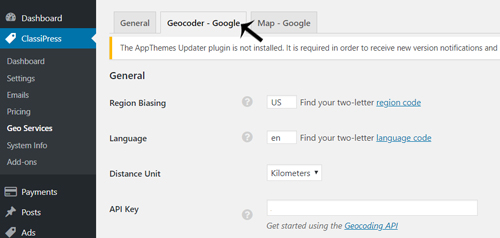
Geocoder – Google
Now that we have seen the General Settings for maps let’s go through the Google geocoder tab. Google is the default goecoder for an AppTheme. You can set up language and region biasing for Google’s geocoder using the options below.
- Region Biasing: This option lets the AppTheme get a better idea of the locations being entered by your users. For example, if you enter the country code “US” (for the United States) for Region Biasing and a user enters ‘Florence’ in the location search, Google knows that they probably meant ‘Florence, Alabama’. And if you enter “IT” (for Italy), then Google will fetch ‘Florence, Italy’.You can find more support for country code here.To set up Region Biasing you will have to enter a two letter Country Code and click “Save Changes” button.
- Language: This option allows you to select the language used to display locations and other information on maps.To set the language, enter a two letter language codes, i.e., if you entered ‘EN’ your map will display in “English” likewise, ‘DE’ for “German”, ‘FR’ for “French” etc. You can find more supported language code from here.
- Distance Unit: Allows you to select the unit of distance to use on your site.
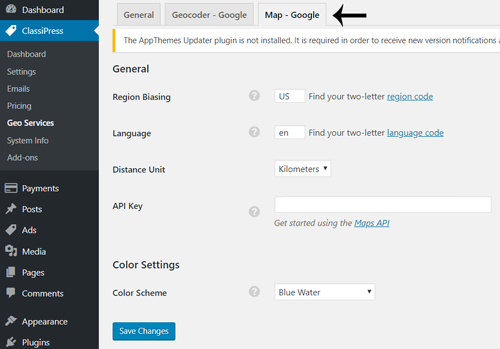
Map Provider – Google
Google is the default Map Provider which is embedded with our AppThemes. You can set up language and region biasing of “Map Provider – Google” using the below mentioned options.
- Region Biasing: This option lets the AppTheme get a better idea of the locations being entered by your users. For example, if you enter the country code “US” (for the United States) forRegion Biasing and a user enters ‘Florence’ in the location search, Google knows that they probably meant ‘Florence, Alabama’. And if you enter “IT” (for Italy), then Google will fetch ‘Florence, Italy’.You can find more support for country code here. To set up Region Biasing you will have to enter a two letter Country Code and click “Save Changes” button.
- Language: This option allows you to select the language used to display locations and other information on maps. To set the language, enter a two letter language codes, i.e., if you entered ‘EN’ your map will display in “English” likewise, ‘DE’ for “German”, ‘FR’ for “French” etc. You can find more supported language code from here.
- Distance Unit: Allows you to select the unit of distance to use on your site.
Using Map Widgets
Now that you have set up “Geo Settings”, we will walk you through set up and use of the location widgets. There are two location widgets available in Vantage.
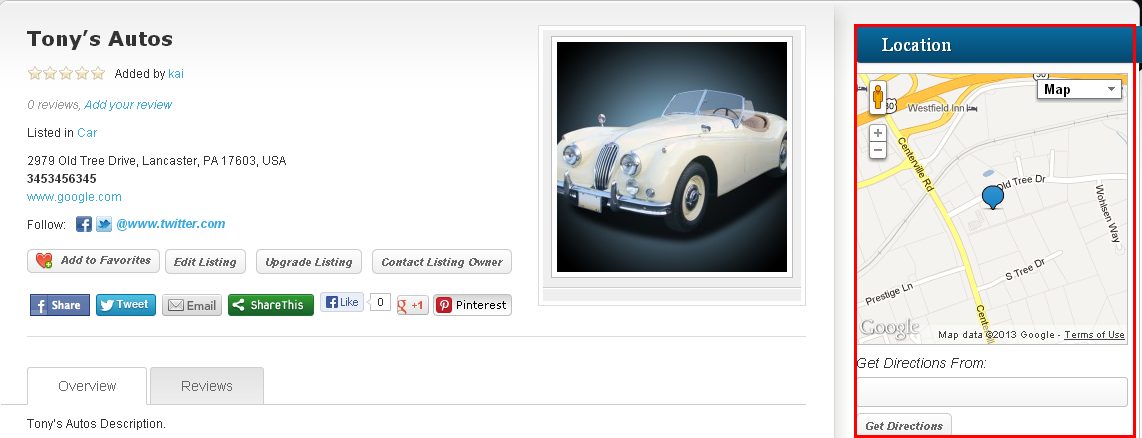
Vantage – Listing/Event Location widget
The Vantage – Listing/Event Location widget displays a map containing the location of a single listing or event. This widget is used in the Single Listing Sidebar or the Single Event Sidebar.To use it, go to Admin > Appearance > Widgets. In the Available Widgets area, drag the Vantage – Listing/Event Location widget and drop it in the Single Listing Sidebar or the Single Event Sidebar.
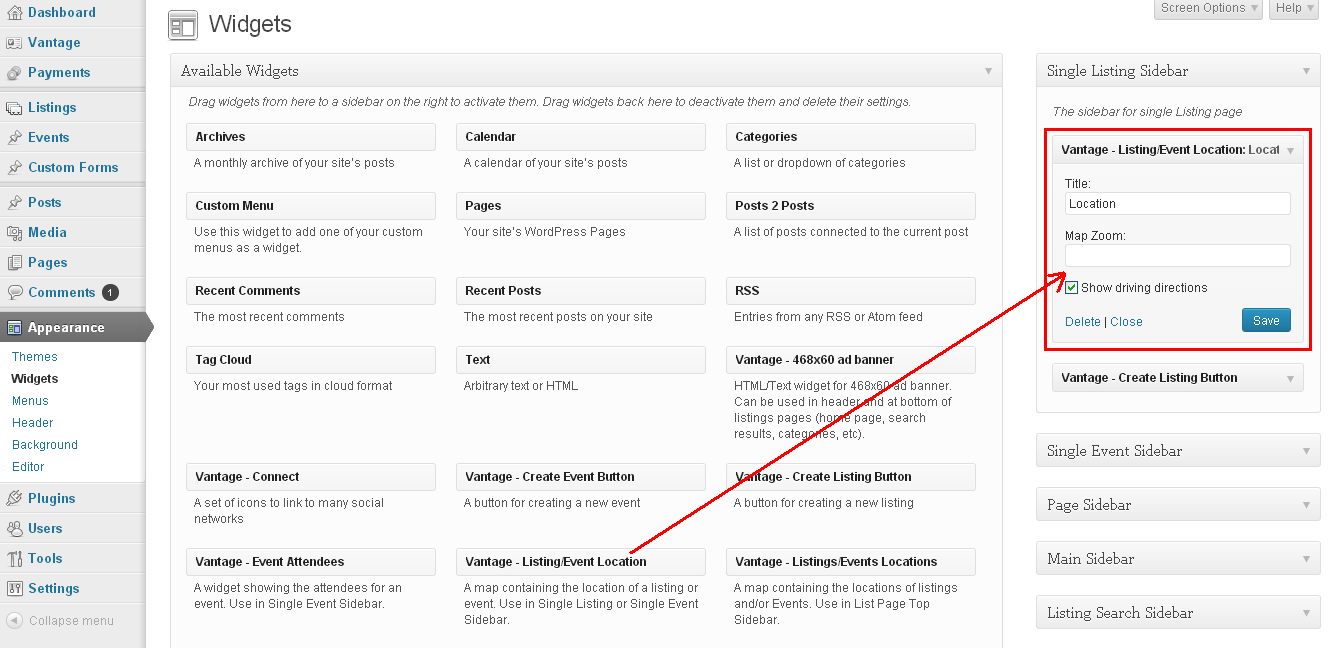
Let’s review the options for this widget:
- Title: If you want to display a specific title in the sidebar for the map widget, then you can do this by entering the desired text in the Title field and clicking “Save”. This will display the title above the map in the sidebar. If it is left blank then the map will be displayed without a title.
- Map Zoom: This option is used to define the default zoom in level for the location on map, if left blank it will use the default zoom in settings. You can enter numeric values from 0 to 100, these values will be considered as percentage (you do not need to type the % symbol, only a number).
- Show Driving Directions: This option is used to enable the driving directions option. Enabling driving directions adds another text field below map. If a user wants to get directions, they simply enter their location in the additional text field and click the “Get Directions” button. Detailed directions will be displayed with an option to print the directions.
Vantage – Listings/Events Locations widget
The Vantage – Listings/Events Locations widget displays a large map at the top of all the pages where a list of listings or events is displayed – like the home page, search results or similar. All items on a given list page will appear on this large map – events and listings, all on one map.
To activate the large map go to, Admin > Appearance > Widgets. Look for the Vantage – Listings/Events Locations widget in the Available Widgets area and drag the widget to the List Page Top Sidebar as shown in the image below.
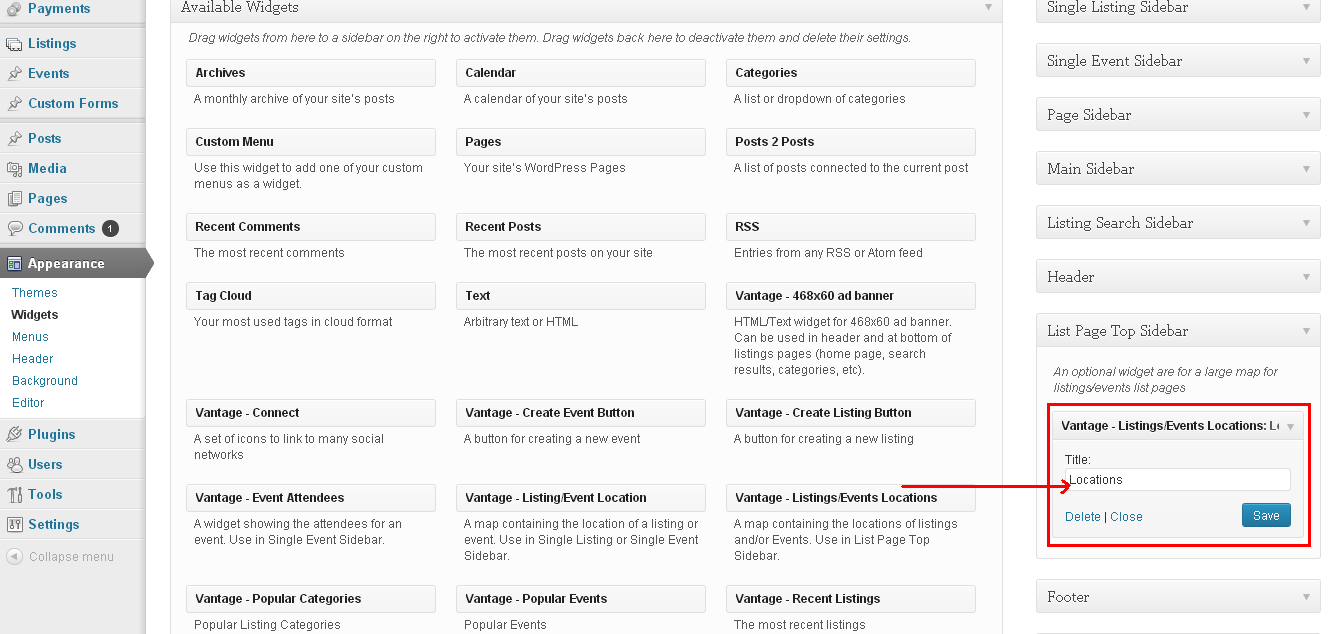
The Vantage – Listings/Events Locations widget is very simple and has only one option.
- Title: If you want to display a specific title in the frontend for the map then, you can do this by entering desired text in “Title” field and clicking “Save”. This will display the title above the map. Entering Title is optional. If it is left blank then the map will be displayed without a title.
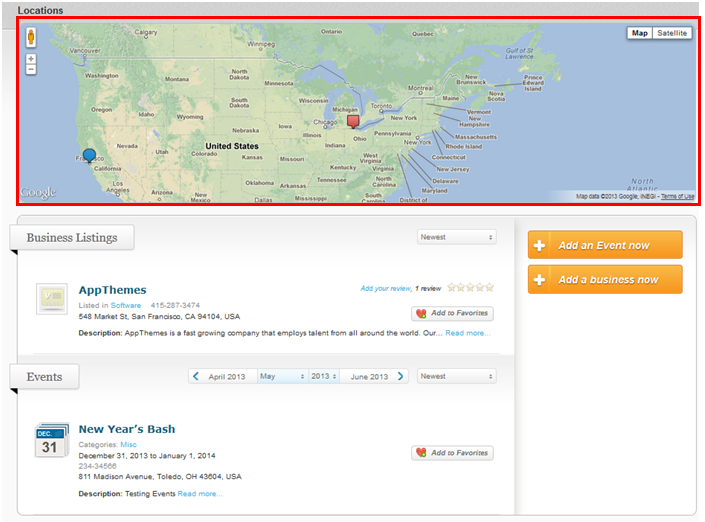
The image below shows how the map is displayed on the Home Page. In the map, locations for listings are marked with a blue pin, and events are marked with a red pin.
Like this tutorial? Subscribe and get the latest tutorials delivered straight to your inbox or feed reader.