Adding custom fields to the registration form is a recurrent question on our forums so this tutorial goes directly to site owners wanting to collect additional data from registering users.
We will explain to you how to add new fields to registration form and then make these fields available on the user profile (frontend/backend) for viewing/editing.
We will show you how to do this on a JobRoller theme but this can be applied to any of our themes with minor HTML/CSS tweaking.
Getting Started
Before starting, you need to create a child theme. This will avoid modifying any of your core files.
We’ve already written several tutorials focusing on child themes so please refer to this tutorial to set up the child theme:
All the HTML/PHP code in this tutorial should be added to your child-theme functions.php file.
Adding Custom Fields to the Registration Form
For this example we’ll use custom fields that could be easily adapted to a production site. Also, two of these fields will be required. Users won’t be able to register unless they fill the required fields.
Here are the new fields we’ll use for the tutorial:
- Name (input) [required]
- Age (checkbox [required]
- Referral (select) [optional]
- Referral ID (input) [optional]
Adding these fields is as simple as calling the WordPress action register_form. When this action is triggered we attach a function callback that outputs the necessary HTML to display the fields.
We’ll name the callback function that displays the fields, at_custom_fields(). Here’s the callback PHP code:
// display the custom fields
function at_custom_fields() {
?>
  <fieldset class="at_fieldset">
   <legend><?php _e('Personal Information (required)', 'appthemes'); ?></legend>
   <p>
     <label for="at_name"><?php _e('Name', 'appthemes'); ?></label><br/>
     <input class="text" type="text" name="at_name" id="at_name" value=<?php if (isset($_POST['at_name'])) echo esc_attr($_POST['at_name']); ?>>
   </p>
   <p>
     <input type="checkbox" name="at_age" id="at_age" value="yes" <?php echo checked( ! empty( $_POST['at_age'] ) )?> />
     <label for="age"><?php _e('I\'m over 18 ', 'appthemes'); ?></label>
  </p>
  </fieldset>
  <br/>
  <fieldset class="at_fieldset">
   <legend><?php _e('Additional Information', 'appthemes'); ?></legend>
   <p>
     <label for="at_referral"><?php _e( 'How did you find us?', 'appthemes' ); ?></label><br/>
     <select name="at_referral" id="at_referral">
       <option value=""></option>
       <option value="Friend" <?php echo selected ( isset( $_POST['at_referral'] ) && 'Friend' == $_POST['at_referral'] ); ?> ><?php _e('Friend', 'appthemes'); ?></option>
       <option value="Search Engine" <?php echo selected ( isset( $_POST['at_referral'] ) && 'Search Engine' == $_POST['at_referral'] ); ?> ><?php _e('Search Engine', 'appthemes'); ?></option>
       <option value="Advertising" <?php echo selected ( isset( $_POST['at_referral'] ) && 'Advertising' == $_POST['at_referral'] ); ?> ><?php _e('Avertising', 'appthemes'); ?></option>
     </select>
   </p>
   <p>
     <label for="at_referral_id"><?php _e('Referral ID', 'appthemes'); ?></label><br/>
     <input type="text" class="text" class="at_number" name="at_referral_id" id="at_referral_id" value=<?php if (isset($_POST['at_referral_id'])) echo esc_attr($_POST['at_referral_id']); ?>>
     <p class="at_referral_note"><?php _e('If you have a Referral ID please insert in the field above. It will give you access to special discounts to you and the referral.', 'appthemes'); ?></p>
    </p>
    </fieldset>
    <style type="text/css">
	.at_fieldset { border: 1px solid #ccc; padding: 10px; border-radius: 5px; }
	.at_referral_note { font-size: 12px; color: #ccc; }
	.at_number { width: 100px }
    </style>
<?php
} |
The callback will display and and auto-fill the new fields if the users returns to the registration form for any reason (empty required fields, errors, etc). Also, notice that for clarity sake, we’ve embedded some CSS styles. This styles should be added to your ‘styles.css’ file.
All the output text in the snippet is also translatable and can be imported to your .po/.pot fields.
Now that we have the callback that outputs the custom fields ready we just need to call add_action() with the action register_form and our callback, at_custom_fields, as it’s parameters:
// display the custom fields on registration form add_action( 'register_form', 'at_custom_fields' ); |
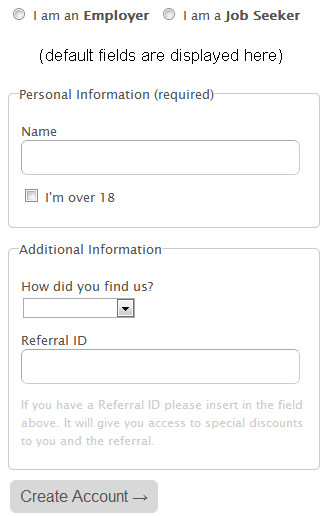
After reloading your registration page your registration form should look something like this:
Validating New Fields
The new fields are being displayed so now we need to make sure the required fields are not empty and that a valid name was entered by the user.
To do this we will create a new callback function at_validate_custom_fields() that reads all the posted data and is triggered by the action register_post. It handles all post data from a user registration.
Here’s how the validation callback should be like:
// validate fields function at_validate_custom_fields( $login, $email, $errors ) { // fields to be validated $fields = array( 'at_name' => __( 'Name', 'appthemes' ), 'at_age' => __( 'Age', 'appthemes' ), ); // check for empty required fields an display notice foreach ( $fields as $field => $value ) { if ( empty( $_POST[$field] ) ) { $errors->add('empty_fields', __('<strong>ERROR</strong>: “', 'appthemes').$value.__('” is a required field.', 'appthemes')); } } // check for invalid names (letters and spaces) if ( ! empty( $_POST['at_name'] ) && preg_match("/[^a-zA-Z ]/", $_POST['at_name']) ) { $errors->add('invalid_name', __('<strong>ERROR</strong>: “', 'appthemes').$fields['at_name'].__('” does not contain a valid name.', 'appthemes')); } // additional custom fields validations here } |
You can see we’re only validating the two required fields and adding an extra validation to make sure the name only contains letters. Always make sure you validate all user data. If you’re asking for a number, make sure you are getting a number. If you’re expecting a limited set of fixed values make sure the value entered is one of those values.
We’re ready to attach the new callback to register_post. This action receives 3 parameters so you must define it like this:
// validate custom fields add_action( 'register_post', 'at_validate_custom_fields', 10, 3 ); |
With the validations in place, leaving the name empty will display the related notice:

Save Custom Fields on the Database
Our custom fields are being displayed and validated but we still need to save them on the database so we can access them later. This is done by using the action user_register. It allows you to access data for a new user immediately after they are added to the database, so we’ll use it to save the custom fields.
Again, we will create a new callback – at_register_custom_fields() – to sanitize (clean) and save the fields:
// register the extra fields as user metadata function at_register_custom_fields( $user_id, $password = "", $meta = array() ) { // custom fields $fields = array( 'at_name', 'at_age', 'at_referral', 'at_referral_id', ); // cleans and updates the custom fields foreach ( $fields as $field ) { $value = stripslashes( trim( $_POST[$field] ) ) ; if ( ! empty( $value ) ) { update_user_meta( $user_id, $field, $value ); } } } |
Our new callback loops through all the new posted fields, unquotes strings using stripslahes() and trims blank spaces with trim(), before saving them on the database using update_user_meta().
The new callback is triggered like this:
// save the custom fields to the database as soon as the user is registered on the database add_action( 'user_register', 'at_register_custom_fields' ); |
Whenever a new user registers, the new fields data are saved on the database.
Displaying the Custom Field Values
Allowing the user to fill custom fields is great but now you need to let the user access these values, make them available on the admin users profile page or display them somewhere on the site. No worries, we’ve got you covered, please continue reading.
Displaying the fields on the frontend and backend requires different action hooks:
- show_user_profile (backend)
- edit_user_profile (frontend)
For this example we will display the fields on both so we’ll make sure the callback that outputs the HTML takes this into consideration and style it accordingly:
// display custom fields/values on the backend or frontend
function at_custom_fields_display( $user ) {
   $user_id = $user->ID;
?>
   <?php if ( is_admin() ) { ?>
        <!-- // show the backend HTML -->
	<h3><?php _e('Additional Information', 'appthemes'); ?></h3>

 	<table class="form-table">
	<tr>
	  <th><label for="at_name"><?php _e('Name', 'appthemes'); ?></label></th>
	  <td>
	   <input class="text" type="text" name="at_name" id="at_name" value="<?php echo get_user_meta( $user_id, 'at_name', true ) ; ?>">
	   </td>
	</tr>
	<tr>
	  <th><label for="at_referral"><?php _e( 'How did you find us?', 'appthemes' ); ?></label></th>
	  <td>
	   <strong><?php echo get_user_meta( $user_id, 'at_referral', true ) ; ?></span>
	  </td>
	</tr>
	<tr>
	  <th><label for="at_referral_id"><?php _e('Referral ID', 'appthemes'); ?></label></th>
	   <td>
	     <strong><?php echo get_user_meta( $user_id, 'at_referral_id', true ) ; ?></strong>
	   </td>
      </tr>
      </table>

	<?php } else { ?>

        <!-- // show the frontend HTML -->
	<fieldset>
	   <legend><?php _e('Personal Information', 'appthemes'); ?></legend>
	   <p>
	    <label for="at_name"><?php _e('Name', 'appthemes'); ?></label>
	    <input class="text" type="text" name="at_name" id="at_name" value="<?php echo get_user_meta( $user_id, 'at_name', true ) ; ?>">
	   </p>
	</fieldset>
	<br/>
	<fieldset>
	   <legend><?php _e('Additional Information', 'appthemes'); ?></legend>
	   <p>
	      <label for="at_referral"><?php _e( 'How did you find us?', 'appthemes' ); ?></label>
	      <strong><?php echo get_user_meta( $user_id, 'at_referral', true ) ; ?></strong>
	    </p>
	    <p>
	      <label for="at_referral_id"><?php _e('Referral ID', 'appthemes'); ?></label>
	      <strong><?php echo get_user_meta( $user_id, 'at_referral_id', true ) ; ?></strong>
	     </p>
	   </fieldset>

	<?php } ?>
<?php
} |
To get the values of new fields from the database we just need to use get_user_meta(), by passing the user id, the name of the field, and an extra parameter to instruct wordpress to return only a single value instead of an array of values.
From the snippet you can also notice the use of is_admin() to check if we should display the HTML output for the backend or frontend.
The new fields/values are ready to be displayed so let’s add the actions that trigger the callback:
// display the custom fields on the user profile page (frontend and admin) add_action( 'show_user_profile', 'at_custom_fields_display' ); // frontend add_action( 'edit_user_profile', 'at_custom_fields_display' ); // backend |
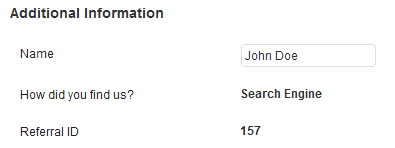
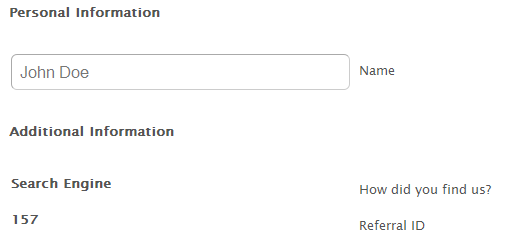
Here’s how the new fields should look like:
Backend (edit profile page):
Frontend (edit profile page):
If you need to echo the new fields values anywhere else on the site you just need to add this snippet of code:
<?php echo get_user_meta( get_current_user_id(), 'the_new_field_name', true ) ; ?> |
To display the new fields on the authors/profile find the authors page template on your theme (for JobRoller it’s ‘author.php’). Copy the file to your child-theme folder, edit it and add the following lines of PHP code where you want the additional data to be displayed:
// display the custom fields on the author page $at_name = get_user_meta( get_current_user_id(), 'at_name', true ); $at_ref_id = get_user_meta( get_current_user_id(), 'at_referral_id', true ); echo sprintf( '<p><span>%1$s: %2$s </span><br/>', __('Name', 'appthemes'), $at_name ); echo sprintf( '<span>%1$s: %2$s </span><br/>', __('Referral ID', 'appthemes'), $at_ref_id ); |
Here’s the output of these changes:

Updating Custom Fields
We have new fields being displayed, validated and saved on the database but what about if we want the new fields to be updated? You should know the answer by now, that’s right, we need to add a new action and a new callback.
Again, we need to use different hooks for the frontend and backend:
edit_user_profile_update (backend)
personal_options_update (frontend)
The callback function to do this is the following:
// updates custom fields function at_custom_fields_update( $user_id ) { if ( !current_user_can( 'edit_user', $user_id ) ) return false; // updatable fields $fields = array( 'at_name', ); foreach ( $fields as $field ) { $value = stripslashes( trim( $_POST[$field] ) ) ; if ( ! empty( $value ) ) { update_user_meta( $user_id, $field, $value ); } } } |
This function sets an array with all the updatable custom fields to sanitize and update. All that’s is left to do is attaching the at_custom_fields_update() callback to the actions:
// additional fields update add_action( 'edit_user_profile_update', 'at_custom_fields_update' ); add_action( 'personal_options_update', 'at_custom_fields_update' ); |
This concludes our tutorial. You are now ready to start collecting additional data from your users. Good Luck!
Questions?
Please use the forum for any questions or comments related with this tutorial.
Like this tutorial? Subscribe and get the latest tutorials delivered straight to your inbox or feed reader.