We would like to thank our valued users of ClassiPress 3.x. While some users continue to love the look of ClassiPress 3.x, others feel as though it’s time for an update. If you are currently using ClassiPress 3.x and are now happy to update to the new look ClassiPress 4.x please review this documentation first.
We have made a lot of design changes in ClassiPress 4. Most changes should just work fine after an upgrade. However, there are some changes/features that are completely new in ClassiPress 4.x and needs manual action. We have outlined the required manual steps in this page. So please carefully review them before you upgrade.
We don’t want your site to break after you click on the automatic upgrade link (without realizing the changes that have happened). So the automatic upgrade from 3.x to 4.x is disabled for now.
From ClassiPress 3.x:
To ClassiPress 4.x:
Consideration #1 – Home Page Header Section and Banner
The new ClassiPress 4.x comes with a built in homepage header area with a banner. This header is complete with typed text that authenticates a classified advertisement site. When you update from ClassiPress 3.x to ClassiPress 4.x you will need to update your existing ‘Ad Listings‘ page so that it has the ClassiPress 4.x feel. This is a simple process that should take no more than a few minutes.
Step 1) Edit your current page that is titled: ‘Ad Listings‘. This page should be an ‘Ad Home Template‘ format. Change the title to ‘Search for…‘ (or similar).
Step 2) Copy and Paste the following shortcodes into the text editor of your page. Make sure to paste it in the Text editor so the formatting doesn’t get copied:
[classipress_typed_elements text="cars in Los Angeles, apartments in Tokyo, antiques in London, bikes in San Francisco, puppies in Paris, anything with ClassiPress!"] People use ClassiPress to create amazing classified listing sites to help visitors find what they are searching for. [classipress_searchbar] |
You can edit the “information within the quotations” to suit the style of your website. These will be the typed elements that are displayed on your homepage. The search bar shortcode allows your customers to search by a category or phrase.
Step 3) Look at the ‘Featured Image’ section of this page and set a featured image that will be shown on the homepage. See example below:
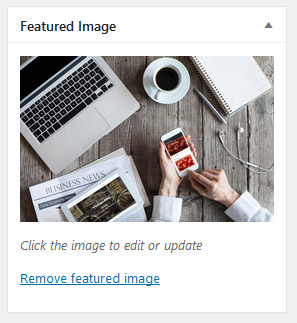
The featured image gets displayed on your homepage so pick a high resolution image. You should pick an image of the following dimension for best result:
- Width: 1920px
- Height: 1250 px
Step 4) Make sure you Update the page to save the changes.
Step 5) In your WordPress dashboard, click on Appearance and then on Customize.
Step 6) Click on Homepage Settings.
Step 7) In the Homepage Dropdown choose your Search for… page.
Step 8) Click the Publish button. Your site will now have the modern feel of ClassiPress 4.x.
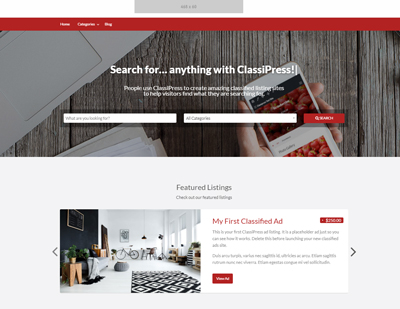
Example: Home Page Header Area
Below is an example of a ClassiPress 4.x homepage banner. The shortcodes added to the ‘Search for…’ page creates the typed text feature and the search bar. The title you give this page will be displayed exactly where the ‘Search for…’ text is below. The featured image you set is used as the background.

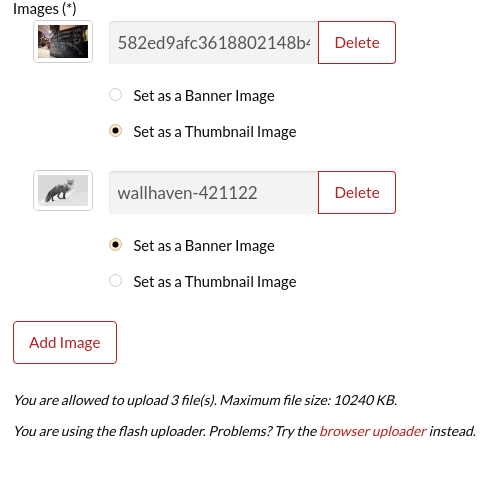
Consideration #2 – Banner and Thumbnail Images for Single Ad Listings
When you update to ClassiPress 4.x you may notice that when an ad is created, the author of the ad has the choice to decide which of their images will appear as the thumbnail for their ad, and which image will be the banner for their ad. This can be configured from the front end of the site when someone is listing an ad.
Example: Setting Banner and Thumbnail Image
When you upload multiple images to an ad, you have the choice of how these images will be displayed.
Consideration #3 – Category Banner
For established sites with hundreds of ads it would be tedious to have to go through each individual ad and choose an image to be displayed as the banner. When you update from ClassiPress 3.x to ClassiPress 4.x each ad banner will appear blank like the following example.
Example: Blank Ad Banner
When updating from ClassiPress 3.x to ClassiPress 4.x your ad banners will be blank like the one below. Adding category ad banners is quick and easy.
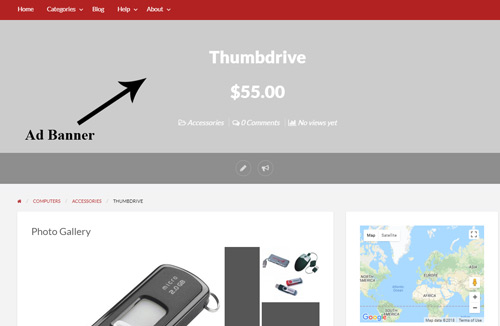
The good news is that a Category banner image can be set. This means that all ads that have been placed within that category will automatically receive that banner. This means that admin will not have to choose a banner for each individual ad.
- Click on Ads and then on Categories.
- Click on the Edit button for the category you wish to apply a banner photo to.
- Click on the Select Image button.
- Once you have uploaded an image, click the Update button. All ads that have been placed in this category will now have a banner image.
- Complete these steps for each category.
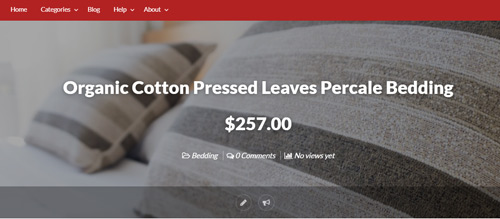
Example: Ad With Category Banner Image
The following ad was placed within the Bedding category. A banner image was applied to the Bedding category and in turn shows up for this categorized ad.