With our new custom form builder, you can add custom fields to your heart’s content. But sometimes, you’re going to want to style that info. This tutorial will show you how to style custom field data on a single listing page in Vantage. If you don’t know what custom fields are and how to use them, see this video tutorial on using the custom form builder in Vantage.
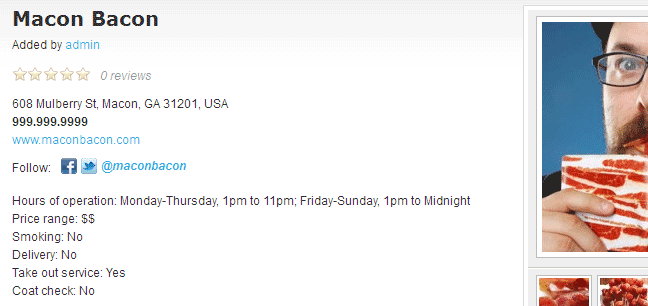
The screenshot below shows unstyled custom fields on a single listing page. Not much going on there but we’re going to change that.
Child Theme It
As always, we’re going to create a child theme to customize our Vantage WordPress directory theme install. If you need a refresher on child theming, see our tutorial on creating child themes and the WordPress codex entry on child themes. Once you have your child theme created, it’s time to start wrangling those custom fields.
Output HTML
Here’s the basic HTML for the custom field data on a single listing page:
<div class="listing-fields"> <p id="listing-custom-field-name-of-custom-field" class="listing-custom-field"> <span class="custom-field-label">Hours of operation</span> <span class="custom-field-sep">: </span> <span class="custom-field-value">Monday-Thursday, 1pm to 11pm; Friday-Sunday, 1pm to Midnight</span> </p> </div> |
You can see that everything is broken down into individual, easy-to-manage pieces. This will make it easy for us to add styles for everything.
Breaking It Down
Now we’re going to start modifying individual styles to our custom fields. Let’s put some exaggerated styles on each of the elements. It will make it easy to see how we are controlling each item.
Containing box
All the custom field data is wrapped by a div with the style “listing fields”. Let’s put a big red border around that box.
.listing-fields {border: 10px solid #F00;} |
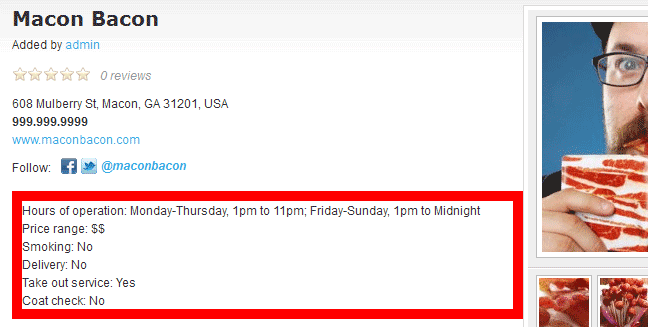
Bam! There’s our huge border and you can see all custom field data is within the box. Pretty simple so far.
All custom fields
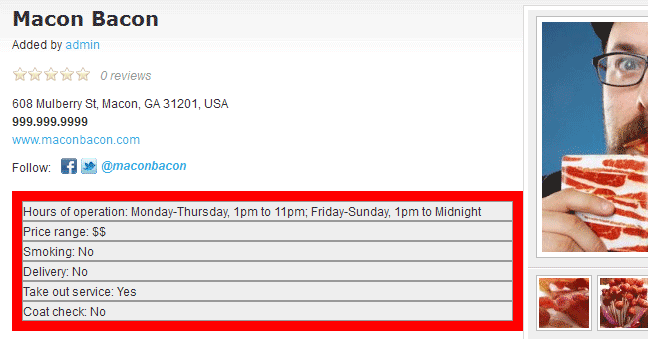
All individual custom fields are contained within a paragraph tag with a class of “listing-custom-field”. If we want to apply one set of styles to all the fields, we can use one (not both) of the following styles – both work equally as well.
.listing-custom-field {background-color: #EEE; border: 1px solid #999;} .listing-fields p {background-color: #EEE; border: 1px solid #999;} |
Custom field elements
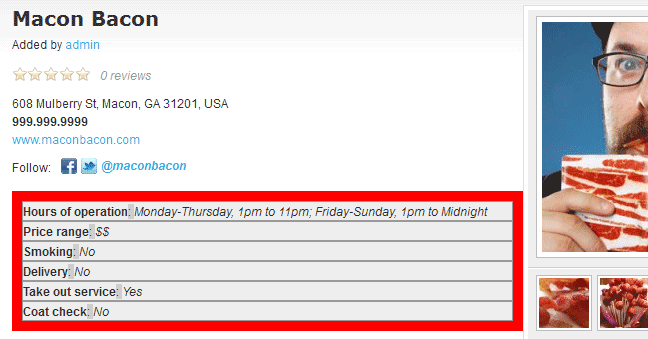
As you can see in the HTML sample above, elements of each custom field are individually wrapped in a span with a class
.custom-field-label {font-weight:bold;} /* the label */ .custom-field-sep {background-color: #CCC;} /* the colon separator */ .custom-field-value {font-style: italic;} /* the value */ |
Nitty Gritty
The styles we have added so far would work in any default Vantage site. But what if you want to style only some custom fields or even one. We will need to do a little work but it is completely possible.
A unique id is added to each custom field on the single listing page. For example, I used the custom form builder to create a custom field for “Hours of operation”. This adds an id of “listing-custom-field-hours-of-operation” to the paragraph tag for that info. I can use this id to style only that field.
#listing-custom-field-hours-of-operation {font-size:18px;} |
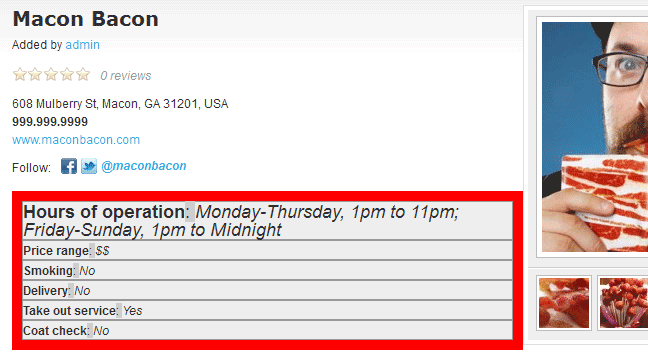
These unique id’s give me the ability to control individual custom fields but I cannot use them until I create them with the custom form builder. The styles are tied to that id for the specific custom field created by a single custom form.
Bringing It All Together
Now that we have seen how to control all elements in the custom fields section of a single listing page, let’s remove the ugly and make this look a little nicer.
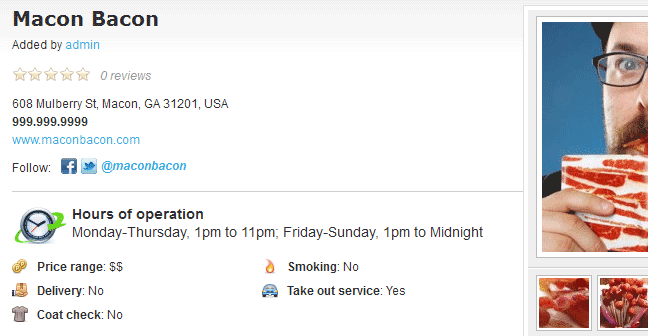
WordPress parses the following HTML for the single listing page shown above.
<div class="listing-fields"> <p class="listing-custom-field" id="listing-custom-field-hours-of-operation"> <span class="custom-field-label">Hours of operation</span> <span class="custom-field-sep">: </span> <span class="custom-field-value">Monday-Thursday, 1pm to 11pm; Friday-Sunday, 1pm to Midnight</span> </p> <p class="listing-custom-field" id="listing-custom-field-price-range"> <span class="custom-field-label">Price range</span> <span class="custom-field-sep">: </span> <span class="custom-field-value">$$</span> </p> <p class="listing-custom-field" id="listing-custom-field-smoking"> <span class="custom-field-label">Smoking</span> <span class="custom-field-sep">: </span> <span class="custom-field-value">No</span> </p> <p class="listing-custom-field" id="listing-custom-field-delivery"> <span class="custom-field-label">Delivery</span> <span class="custom-field-sep">: </span> <span class="custom-field-value">No</span> </p> <p class="listing-custom-field" id="listing-custom-field-take-out-service"> <span class="custom-field-label">Take out service</span> <span class="custom-field-sep">: </span> <span class="custom-field-value">Yes</span> </p> <p class="listing-custom-field" id="listing-custom-field-coat-check"> <span class="custom-field-label">Coat check</span> <span class="custom-field-sep">: </span> <span class="custom-field-value">No</span> </p> </div> |
Using this code, I can find the unique id’s for the individual custom fields. Now I can create the CSS below.
/* Theme Name: Modifying custom fields Version: 1.0 Description: A child theme to demonstrate how to style custom fields Author: You Author URL: http://www.your-site.com Template: vantage */ @import url("../vantage/style.css"); @import url("../vantage/styles/blue.css"); .listing-fields { border-top: 1px solid #CCC; } .listing-custom-field { width: 225px; padding: 3px 0 3px 25px; float: left; background-position: 0 4px; background-repeat: no-repeat; } .custom-field-label { font-weight: bold; } #listing-custom-field-hours-of-operation { width: 500px; margin: 10px 0; padding-left: 60px; background-image: url(images/clock.png); font-size: 14px; } #listing-custom-field-hours-of-operation .custom-field-label { width: 100%; display: block; } #listing-custom-field-hours-of-operation .custom-field-sep { width: 100%; display: none; } #listing-custom-field-price-range { background-image: url(images/points.png); } #listing-custom-field-smoking { background-image: url(images/fire.png); } #listing-custom-field-delivery { background-image: url(images/box-share.png); } #listing-custom-field-take-out-service { background-image: url(images/car.png); } #listing-custom-field-coat-check { background-image: url(images/t-shirt-gray.png); } |
As long as you have a little knowledge of CSS, you can create whatever style to fit your specific needs. Give it a try yourself and make your custom fields data shine. Just remember to always use child themes. Have fun!
Like this tutorial? Subscribe and get the latest tutorials delivered straight to your inbox or feed reader.


