Vantage 4.0 uses a page template and widgets on it’s homepage which allows you to completely customize it to your liking.
On new installs, your homepage should already be setup correctly. If not, the following tutorial will explain how to manually set this up.
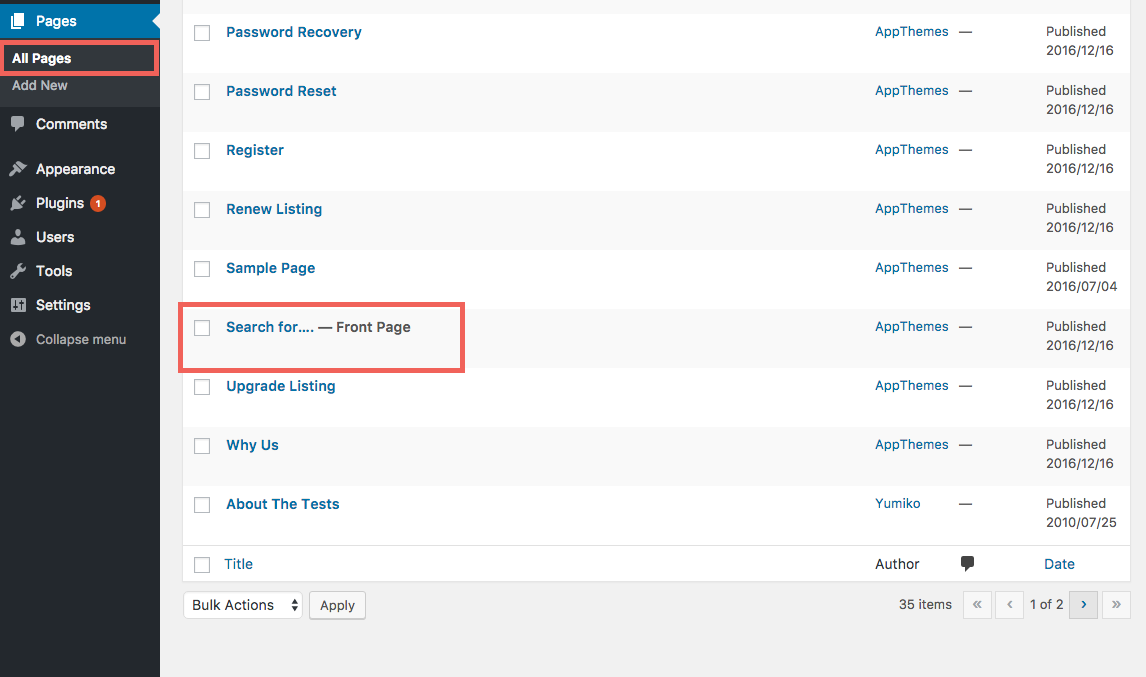
Confirm Homepage Exists
Go to your WordPress admin and click on pages, now browser through the pages and look for your homepage (it will have the following after the page title -Front Page).
Your homepage should already be assigned the “Front Page” attribute. If now please see the sections below on how to do this.
If a homepage doesn’t exist, go ahead and create a new page and add the following code to your new homepage.
[vantage_typed_elements text="tacos in San Francisco, coffee in Tokyo, pet food in London, office space in Paris, anything with Vantage!"] People use Vantage to discover great local businesses. What will you find in your neighborhood? <a class="button large" href="listings/?ls=">BROWSE LISTINGS <i class="fa fa-chevron-circle-right"></i></a> |
Set Front Page Attribute for Your Homepage
Option 1: Set Front Page Attribute in Your WordPress Admin Settings
You will need to set your new homepage as the front page of your site. To do this you can use the following 2 options.
Option 1 allows you to set the front page attribute in your WordPress admin settings.
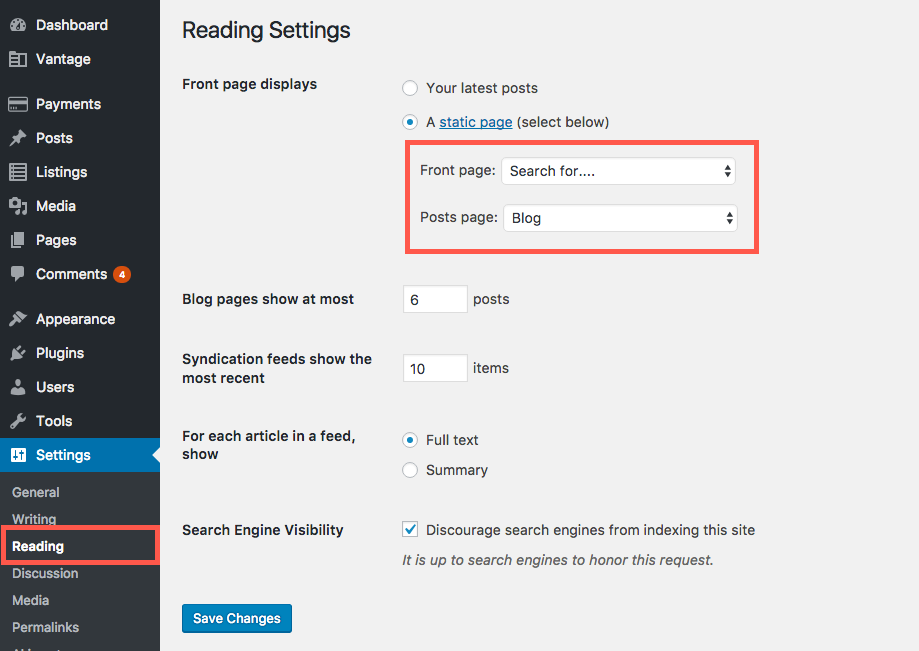
- Go to your WordPress Admin and click on ‘Reading” under the “Settings” menu of your WordPress admin.
- Set the “Front Page” to the page you want to use as the front page of your site.
- Click the save changes button.
Option 2: Setting the Front Page Attributes Directly in the Page/Post Editor.
Option 2 allows you to set the front page attribute in your WordPress page or post editor.
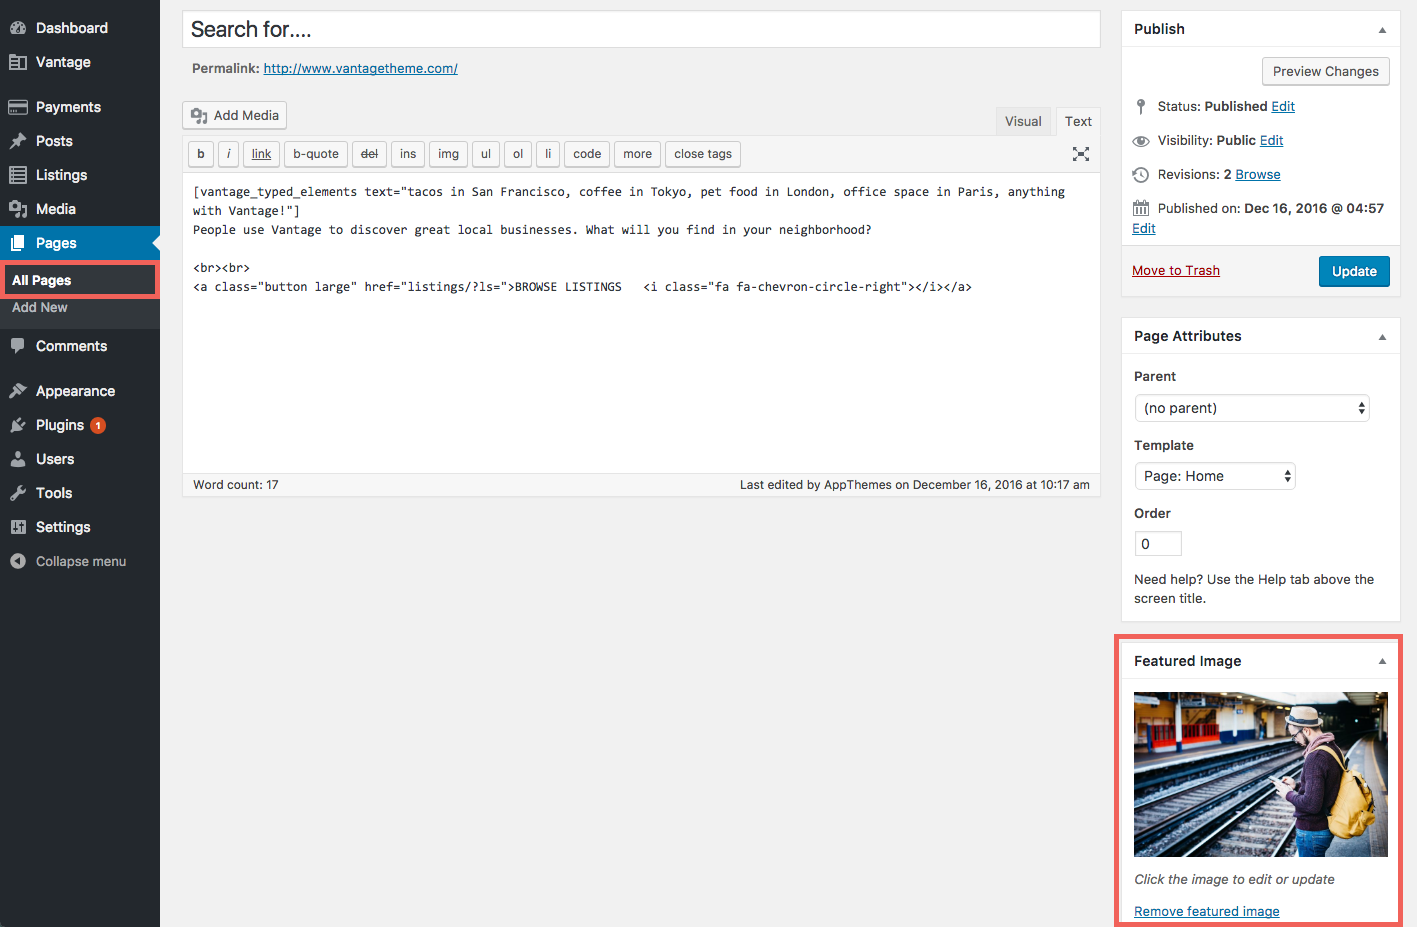
- Go the Pages menu of your WordPress admin.
- Find the page you want to use as your homepage and click to edit this page.
- Under the Page Attributes Menu set the template field to “Page Home”
- Update the page to save your changes.

Option 3: Setting the Front Page from the Customizer
You can set your front page using the customizer also.
- Go to the Appearance menu from your WordPress admin dashboard.
- Click on the Customize link.
- Click on the Homepage Settings.
- Set the page you want to be your site’s front page.
Set a Background Image for Your Homepage
Without a main background image, your site will look pretty plain.
How to Add an Image to Your Homepage:
- Go to the Pages menu of your WordPress admin.
- Find your homepage and click edit.
- Go to the Featured Image section and set a featured image. You can choose to use an image that is already in your media library or you can upload one.
We recommend to using a large high-resolution image (1920×1080 or greater) otherwise it will look pixelated or distorted..You can also choose to use the default image we provide, if you do not want to use your own. Here is a link to the default image we provide.
- Update the page to save the changes you have made.
Custom CSS to Position the Background Image
There are some images you may need to re-position once you have added them. Custom CSS can be added to the custom css section of your WordPress admin to make these adjustments.
How to Add Custom CSS:
- Go to your WordPress admin
- Under the “Appearance” menu click “Customize”
- In the customize window click “Additional CSS”
- Add your custom CSS in this section
- Click the “Publish” button at the top of the page
Custom CSS – Position Background Image
Position Image Top – This will position the image from the top down. If you image is larger than the required size the bottom of this image will be hidden.
.home-cover {
background-position-y: top;
}
Position Image Bottom – This will position the image from the bottom up. If you image is larger than the required size the top of this image will be hidden.
.home-cover {
background-position-y: bottom;
}
Adding Page Content to Your Homepage
Using Widgets to Add Content to Your Homepage
Vantage 4.0 uses widgets to layout content throughout your site. The homepage is no exception. Everything between the main header image and footer are widgets. Let’s go setup some content!
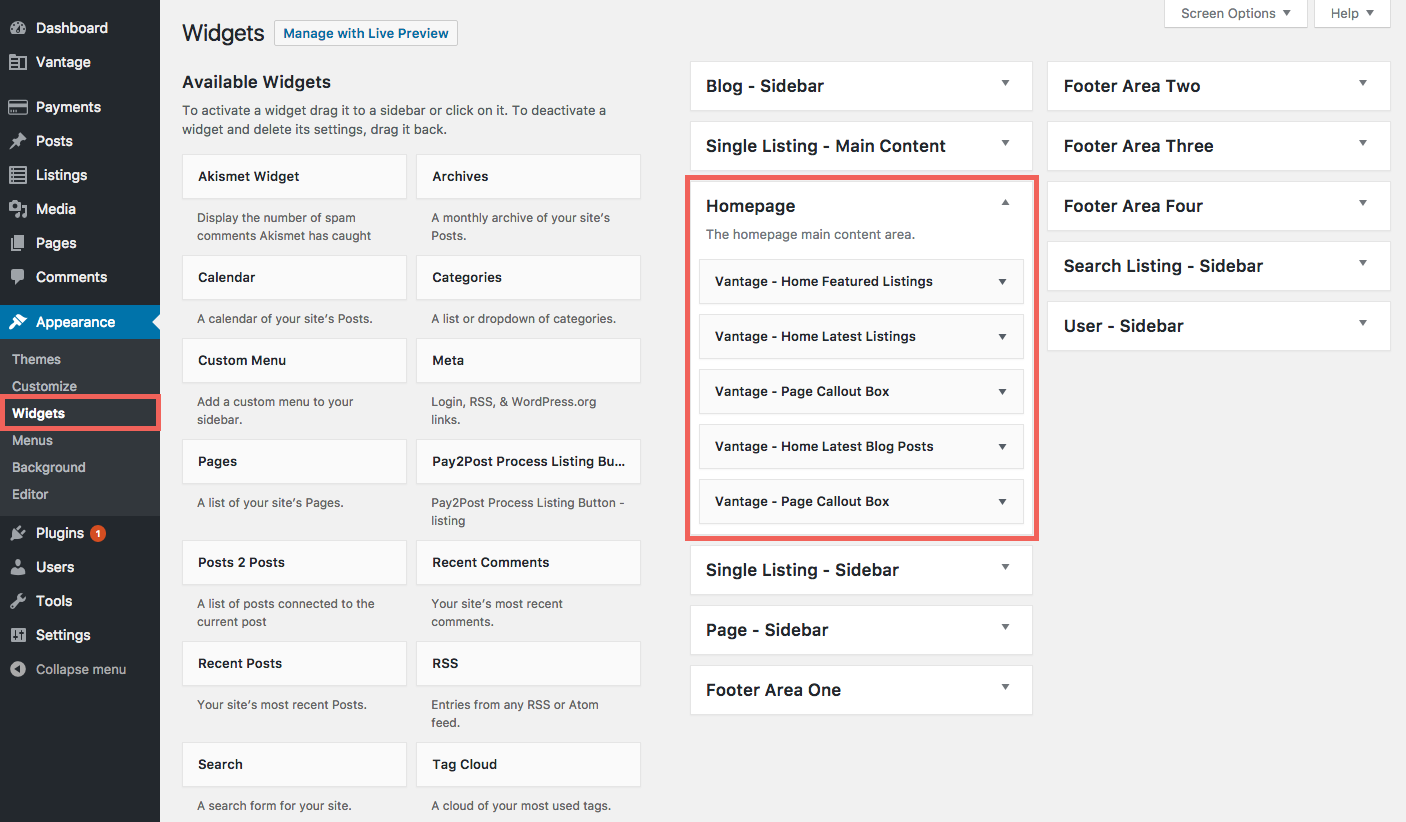
- Go to your WordPress admin and click the “Widgets” menu under the “Appearance” menu.
- Select the widgets you’d like to use from the list of available widgets.
- Add these widgets to the “Homepage” widget area.
Widgets added to the “Homepage” widget area will display as content on your site between the main header and the footer.
Download our App Widget Callout
If you’d like to use the default callout widget content for the “Download our App” section, you can use the followings to do this.
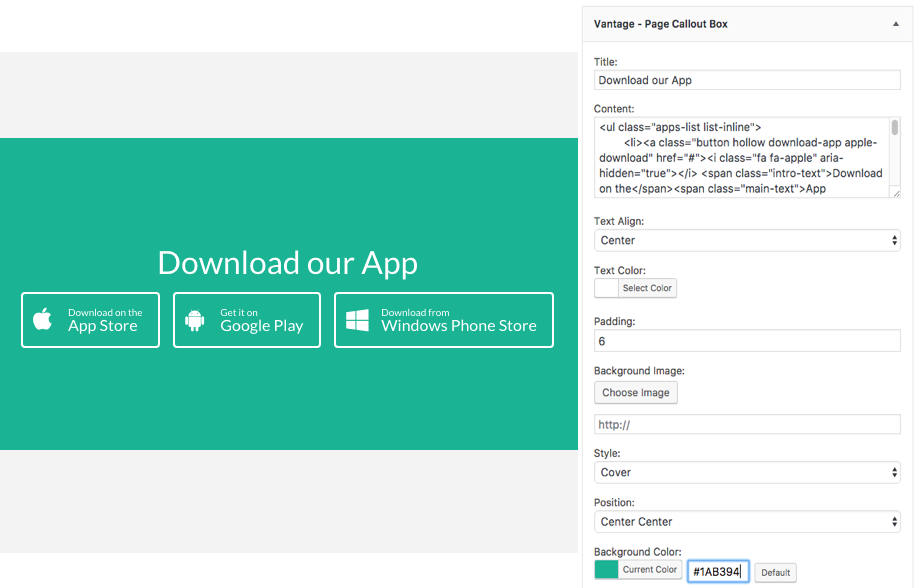
- Go to your WordPress admin and click the “Widgets” menu under the “Appearance” menu.
- Select the “Vantage – Page Callout Box” widget from the available widgets list.
- Copy the settings from the screenshot in this section.
- Copy and paste the html from the box below into the “Content” section of the widget.
HTML code to copy
<ul class="apps-list list-inline">

<li><a class="button hollow download-app apple-download" href="#"><i class="fa fa-apple" aria-hidden="true"></i> <span class="intro-text">Download on the</span><span class="main-text">App Store</span></a></li>

<li><a class="button hollow download-app android-download" href="#"><i class="fa fa-android" aria-hidden="true"></i> <span class="intro-text">Get it on</span><span class="main-text">Google Play</span></a></li>

<li><a class="button hollow download-app windows-download" href="#"><i class="fa fa-windows" aria-hidden="true"></i> <span class="intro-text">Download from</span><span class="main-text">Windows Phone Store</span></a></li>

</ul>
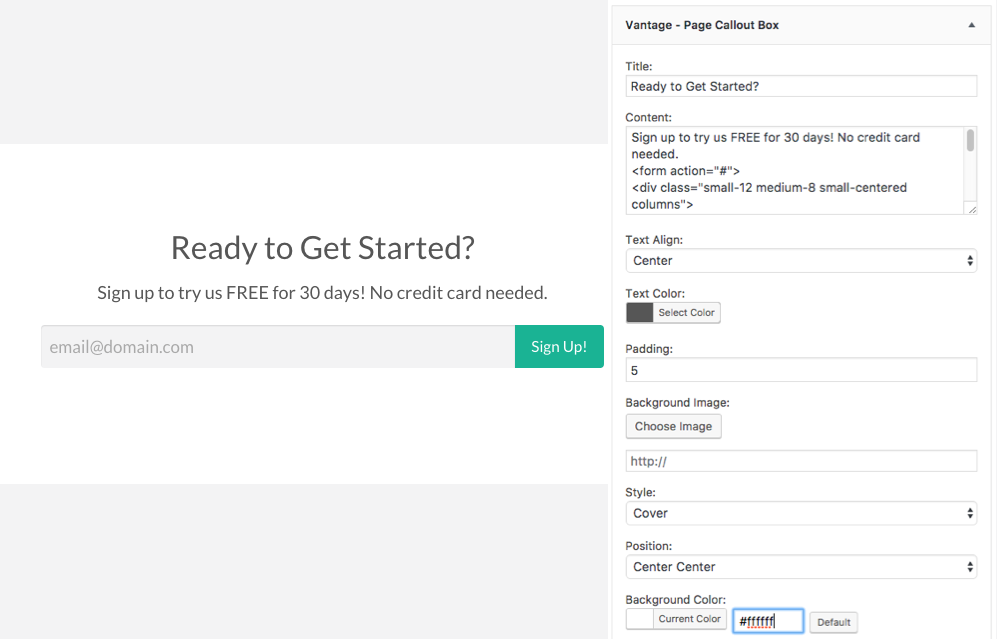
Ready to Get Started Widget Callout
If you’d like to use the default callout widget content for the “Ready to Get Started?” section, follow these steps.
- Go to your WordPress admin and click the “Widgets” menu under the “Appearance” menu.
- Select the “Vantage – Page Callout Box” widget from the available widgets list.
- Copy the settings from the screenshot in this section.
- Copy and paste the html from the box below into the “Content” section of the widget.
HTML Code to Copy
Sign up to try us FREE for 30 days! No credit card needed.

<form action="#">

<div class="small-12 medium-8 small-centered columns">

<div class="input-group">

<input class="input-group-field" type="email" placeholder="[email protected]"><div class="input-group-button">

<input type="submit" class="button" value="Sign Up!">

</div>

</div>

</form>
Like this tutorial? Subscribe and get the latest tutorials delivered straight to your inbox or feed reader.