By default, WordPress sets the maximum upload file size to 32MB (code is located in wp-settings.php) which, for most people, is large enough. However, if you would like to increase your max upload file size to something higher, you can follow this simple trick.
Prerequisites
- Comfortable editing a WordPress PHP file
- Comfortable uploading files via SFTP
Getting Started
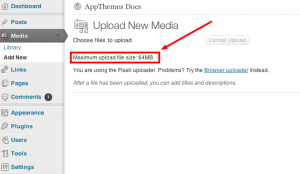
 Before we begin, let’s find out what your current max upload file size is. This can easily be found from within the WordPress admin area.
After logging in, go to “Media” => “Add New” and you’ll see “Maximum upload file size: XXMB”. This is the maximum upload file size allowed by WordPress.
If that is large enough for you, then you don’t need to follow this tutorial, otherwise continue reading.
Step 1
First you’ll want to download wp-config.php from your live website (using an SFTP client like FileZilla) which is located in your WordPress directory. For example, /home/YOURDOMAIN/public_html/wp-config.php.
Step 2
After you have downloaded wp-config.php, you’ll want to open it with a text editor (Notepad, TextEdit, Dreamweaver, TextWrangler, etc).
Step 3
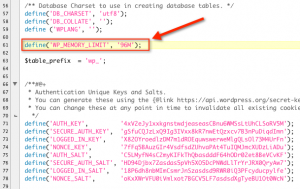
Now you’ll want to look for define ('WPLANG', ''); which will be somewhere within wp-config.php. If it’s not, no biggy. Right below that line of code (or anywhere really as long as it’s on a new line), paste the following code:
define('WP_MEMORY_LIMIT', '96M'); |
 That will increase the max upload file size to 96MB. If you’d like to go even higher, change the 96 to something like 128 or 192.
Note, just because you set these values higher, doesn’t necessarily mean it will work. Your host provider likely sets a global max upload file size which trumps whatever you use here.
Step 4
Make sure to save your wp-config.php file and SFTP it back up to your live website. It should prompt you to overwrite the existing wp-config.php so just click “Ok”.
Step 5
Go back to your web browser and take a look at the “Add New” media page again. It should now show the updated “Maximum upload file size: XXMB”.
Typical Issues
If you’ve followed all these steps and the max upload file size didn’t change, there could be several causes.
- Your web host provider (usually shared hosting) sets a ceiling on the max upload file size so you’ll have to contact them and ask them to increase it.
- Your web host provider gives you access to your php.ini file. You’ll need to edit it and change the
upload_max_filesize.
If you’re still stuck, the best bet is to contact your web host provider and explain what you’re trying to do. Most of the time, they won’t be able to change it unless you upgrade to their virtual or dedicated server packages. This is standard practice on a shared host server.
Typical Error Messages
A fairly common error you will see when trying to upload a file larger than your settings is: Fatal error: Allowed memory size of 33554432 bytes exhausted followed by a server directory path.
Like this tutorial? Subscribe and get the latest tutorials delivered straight to your inbox or feed reader.


