If you are finding your current theme footer too restrictive and you want to display more than your copyright notice, this tutorial will help you. It will teach you how to setup a fully widgitized multi-column footer on any of our themes.
Child Theme
Before starting, you need to create a child theme. This will avoid modifying any of your core files while making your new footer available on every future theme updates.
We’ve already written several tutorials focusing on child themes so please refer to this tutorial to set up the child theme:
Creating Sidebars
Moving on to the actual process of creating the widget areas on the footer, it’s as simple as calling the WordPress function, register_sidebar().
This function automatically registers a sidebar based on the arguments we pass through it. We will use sidebars on our footer to add widgets. These will be our widget areas. Here’s the default usage as stated on the WordPress Codex:
$args = array( 'name' => sprintf(__('Sidebar %d'), $i ), 'id' => 'sidebar-$i', 'description' => '', 'before_widget' => '<li id="%1$s">', 'after_widget' => '</li>', 'before_title' => '<h2>', 'after_title' => '</h2>' ); |
For this tutorial we’ll create a 3 column footer with 3 widget areas, or, sidebars. This means we’ll need to call this function for each column. We’ll use some some PHP magic to simplify this process. Add the following code to your theme’s ‘functions.php’ file, under your child theme folder:
function at_register_sidebars() { $max_columns = 3; // change to number of columns you want to add to your footer $text_domain = 'appthemes'; // the text domain to use for translating the strings foreach ( range(1, $max_columns) as $number ) { $sidebar_name = sprintf(__('Footer Column %d', $text_domain), $number ); register_sidebar( array( 'name' => $sidebar_name, 'description' => '', 'before_widget' => '<li id="%1$s" class="widget %2$s">', 'after_widget' => '</li>', 'before_title' => '<h2 class="widgettitle">', 'after_title' => '</h2>', ) ); } } |
As you can see from the code snippet, we’re creating 3 columns as defined on the columns variable ‘$max_columns’. It register’s 3 sidebars named ‘Footer Column 1’, ‘Footer Column 2’ and ‘Footer Column 3’.
We have the function to create the sidebars ready, but we still need to call this function somehow so WordPress can make them available on the dashboard’s widgets page. This can be done using the WordPress Action, ‘wp_loaded’. This should guarantee that your sidebar is registered after the theme’s.
Add the following code to your theme’s ‘functions.php’ file:
add_action( 'wp_loaded', 'at_register_sidebars' ); |
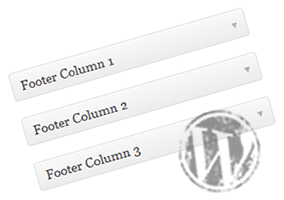
Head over to your dashboard widgets page and you should see 3 new sidebars: Footer Column 1 to 3.
See how hard it was? We are not finished, though, you still need to replace your current theme footer with the multi-columned one.
Footer.php
If you take a close look at your theme files you’ll find one named ‘footer.php’. This file contains your current simpler footer HTML. We will need to replace it with our own so we can display the new sidebars.
Here you’ll see the advantage of using a child theme. Replacing the current ‘footer.php’ file is as simple as creating a new ‘footer.php’ file under the child themes folder. WordPress will automatically use the footer from the child theme. Create it likewise and paste the following HTML/PHP code:
<div id="custom-footer">
<div class="cf-inner">
<?php
$max_columns = 3; // change to number of columns you want to add to your footer
$text_domain = 'appthemes'; // the text domain to use for translating the strings
?>
<?php foreach ( range(1, $max_columns, 1) as $number ) { ?>
<?php $sidebar_name = sprintf(__('Footer Column %d', $text_domain), $number ); ?>
<div class="cf-column">
<div id="cf-col-<?php echo $number; ?>">
<?php dynamic_sidebar( $sidebar_name ); ?>
</div>
</div>
<?php } ?>
<div class="clear"></div>
</div>
<p class="cf-copyright">
<?php _e('Copyright ©', $text_domain); ?>
<?php echo date_i18n('Y'); ?> <?php bloginfo('name'); ?>
</p>
</div> |
The new footer can now display the 3 new sidebars. Some important notes about the new footer. Make sure the ‘$sidebar_name’ is exactly the same as used on the ‘at_register_sidebars()’ function and also that the number of columns match. Otherwise, the footer will not work properly.
Styling the Footer
We’re almost done. To finish, we just need to add some styling to the new footer. Paste these styles on the child theme, ‘styles.css’ file:
/* Custom Footer Styles */ #custom-footer { border-top: 3px solid #ccc; min-height: 100px; display: block; } #custom-footer .cf-inner { margin: 0 auto; text-align: left; width: 990px; } #custom-footer div > li { list-style:none; } #custom-footer li > h2 { padding: 15px 0; } .cf-column { min-height: 345px; float: left; padding: 0 10px; } .cf-column:not(:first-child) { border-left: 1px solid #DEDEDE; padding-left: 10px; } .cf-copyright { border-top: 1px solid #ccc; text-align: center; padding: 20px 0; } #cf-col-1 { width: 300px; } #cf-col-2 { width: 300px; } #cf-col-3 { width: 300px; } |
These styles can be changed at your will. Just make sure if you add more then 3 columns to your footer you also add the related column style.
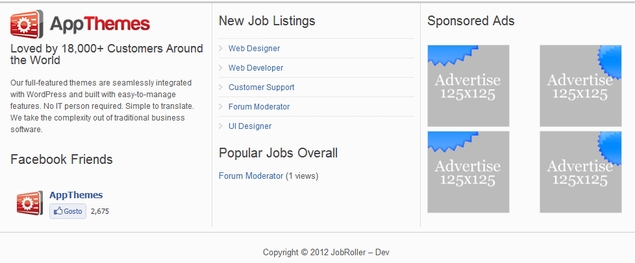
Finally here’s an example of the new footer applied to a JobRoller theme:
Questions?
Please use the forum for any questions or comments related with this tutorial.
Like this tutorial? Subscribe and get the latest tutorials delivered straight to your inbox or feed reader.