We use the WordPress editor on a daily basis so having quick access to certain html tags speeds up our productivity. We’re also primarily a team of developers so we use the html editor instead of the visual one.
Most of the default html editor buttons (also known as Quicktags) are fine, but there’s a few additional ones we wanted to include. After reading through dozens of tutorials online and not finding the “correct” way to do this, we decided to figure it out for ourselves.
As of WordPress 3.3, this entire process became much easier. Believe it or not, before this update the Quicktags JavaScript API “was almost as old as WordPress“. We’re certainly glad the WordPress core team decided to upgrade the old cumbersome API.
Here’s what our html editor looked like before we added three new custom Quicktag buttons (paragraph, horizontal rule, and pre):
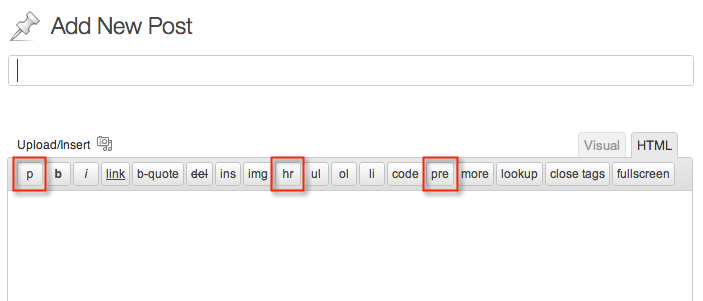
Here’s what it looked like after we added three new custom Quicktag buttons:
Ok, let’s get to the code. You’ll want to paste the following function in your theme’s functions.php file.
// add more buttons to the html editor
function appthemes_add_quicktags() {
?>
    <script type="text/javascript">
    QTags.addButton( 'eg_paragraph', 'p', '<p>', '</p>', 'p', 'p', 1 );
    QTags.addButton( 'eg_hr', 'hr', '<hr />', '', 'h', 'hr', 201 );
    QTags.addButton( 'eg_pre', 'pre', '<pre lang="php">', '</ pre>', 'q', 'pre', 111 );
    </script>
<?php
}
add_action( 'admin_print_footer_scripts', 'appthemes_add_quicktags' ); |
Note: We purposely added a space in </ pre> so the example code above would render correctly. You’ll need to remove it in order for the tag to work in your code.
Pretty easy, no? We’re basically dropping in some Javascript that declares new buttons in the wp-admin page footer. You can add all different types of buttons. To find out more about each parameter, check out the WordPress Quicktags API page.
Adding buttons to the visual editor is a different process and a bit more advanced. You’ll need a custom icon in addition to some more code. We haven’t come across any “correct” tutorials yet but may produce our own in the future.
Like this tutorial? Subscribe and get the latest tutorials delivered straight to your inbox or feed reader.