You have downloaded and installed Quality Control. You’re almost ready to start using the application theme that will help your team be more productive and efficient. This document will walk you through the settings that will help you get the most out of Quality Control.
By now, you should have WordPress installed and Quality Control activated. If you have not yet completed these steps, please see the “Installing WordPress” and “Uploading the Theme” pages.
Site Name and Tagline
Quality Control keeps the “Site Name” and “Tagline” features of WordPress intact. You can change both the site name and tagline to fit your company or project. To do that, click “Settings” in the admin left column menu.
Quality Control renders the site name and tagline in HTML text. The style, color and size of the text can only be changed in the style.css file. The logo can also be changed using the style.css file.
Tickets
Quality Control allows you to sort your tickets by adding categories, milestones, states, tags and priorities. Let’s create options for all ticket properties. You can find all these options under the “Tickets” item in the admin left column menu.
Categories
Do you want your tickets to be labelled as bugs or features? This is the place to do just that. Click “Tickets” > “Categories” to change category options.
When Quality Control is first installed, there will be no categories but we’ll create one now.
- Name – This is the name of your category. If “bug” is your first category, add “bug” to the name field.
- Slug – The slug is a URL friendly version of the category name. You can usually leave this blank and Quality Control will create a slug for you.
- Parent – Suppose your project has different types of bugs that you want to categorize (example: performance, interface, not working). If you have already created a “bug” category, you can use that as a parent category.
- Description – It describes your category and is not displayed by default.
Once you have entered the data for your new category, click the “Add New Category” button. Your category is now saved and will be shown in the categories list the right hand side of the page. You can edit or delete categories at any time.
Tags
Tags will help your team sort tickets even further. Unlike categories, users can add new tags whenever a ticket is created. To set up tags through the admin, go to “Tickets” > “Tags”.
- Name – This is the name of your tag. If “forms” is your first tag, add “forms” to the name field.
- Slug – The slug is a URL friendly version of the tag name. You can usually leave this blank and Quality Control will create a slug for you.
- Description – It describes your tag and is not displayed by default.
Once you have entered the data for your new tag, click the “Add New Tag” button. Your tag is now saved and will be shown in the tags list the right hand side of the page. You can edit or delete tags at any time.
States
States prominently show the status of each ticket in the Quality Control interface. If you want to designate a ticket as open, closed, invalid or otherwise, you will want to create those states here. To create states, go to “Tickets” > “States”.
- Name – This is the name of your state. If “open” is your first state, add “open” to the name field.
- Slug – The slug is a URL friendly version of the state name. You can usually leave this blank and Quality Control will create a slug for you.
- Description – It describes your state and is not displayed by default.
Once you have entered the data for your state, click the “Add New State” button. Your state is now saved and will be shown in the states list the right hand side of the page. You can edit or delete states at any time.
You can create any state you want. With Quality Control, it’s all up to you. Suggestions for different states might include: closed, declined, in progress, new, on hold, open, under consideration.
Later, you will be able to assign colors to states and define the “Default State” and “Resolved State”.
Priorities
Some tickets are more urgent than others. In Quality Control, you can denote that by assigning a priority to your tickets. To create priorities, go to “Tickets” > “Priorities”.
- Name – This is the name of your priority. If “high” is your first priority, add “high” to the name field.
- Slug – The slug is a URL friendly version of the priority name. You can usually leave this blank and Quality Control will create a slug for you.
- Description – It describes your priority and is not displayed by default.
Once you have entered the data for your priority, click the “Add New Priority” button. Your priority is now saved and will be shown in the priorities list the right hand side of the page. You can edit or delete priorities at any time.
At AppThemes, we use the following priorities: high, medium, low. But you can create the priorities that work best for you.
Milestones
Want to designate a ticket to a certain version of your product? Maybe you want to assign a ticket to a fiscal quarter. It’s easy to do with milestones. To create the milestones for your project, go to “Tickets” > “Milestones”.
- Name – This is the name of your milestone. If “2.0” is your first milestone, add “2.0” to the name field.
- Slug – The slug is a URL friendly version of the milestone name. You can usually leave this blank and Quality Control will create a slug for you.
- Description – It describes your milestone and is not displayed by default.
Once you have entered the data for your milestone, click the “Add New Milestone” button. Your milestone is now saved and will be shown in the milestones list the right hand side of the page. You can edit or delete milestones at any time.
Users
Quality Control uses WordPress roles to determine what users can and cannot do with tickets:
- Administrators and Editors
- Can create new tickets
- Can view all tickets
- Can edit all tickets, including tickets created by other users
- Authors and Contributors
- Can create new tickets
- Can view and edit only the tickets created by them or assigned to them
- Subscribers
- Cannot create new tickets
- Can view and edit only the tickets assigned to them
General Settings
Next, we’ll make changes to the Quality Control settings. You can get there by clicking “Quality Control” > “Settings” in the admin left column menu.
Assignment Permissions
There are three different choices available for tickets not assigned to any user. Protected, Read-Only, and Readable/Editable. Depending on how your ticketing system is setup, will determine the best setting for you. For public ticket systems, read-only or protected are usually the best. Setting it to readable/editable means that anyone can edit the ticket which is probably not optimal.
State settings
Quality Control gives you the power to create all the ticket states you will use to run your project. To find out how to create states, see the “States” heading in the “Tickets” section above.
- Default State – This is the state selected by default when creating a new ticket. Usually, “new” or “open” are the best default states. Regardless of the default state, users will be able to select other states when creating new tickets.
- Resolved State – Tickets in this state are assumed to no longer need attention.
- Colors – Help your team easily identify different ticket states in the front end user interface by setting state colors.
- Every state can have a unique background color as well as a text color.
- All colors should be designated in hexadecimal format and prepended with a pound sign (#). For example, #FFF or #FFFFFF for white, #C00 or #CC0000 for dark red, #000 or #000000 for black and so on.
- Leaving a the value for “Background” blank displays the state with no color.
- Omitting a value for “Text” renders the text in the default text color.
Source Control
Now comes the fun part. Quality Control is setup to integrate with either Git or Subversion (SVN) so all your changesets will be pulled into QC and linked up within your tickets. If you don’t use a version control system then you can skip this step.
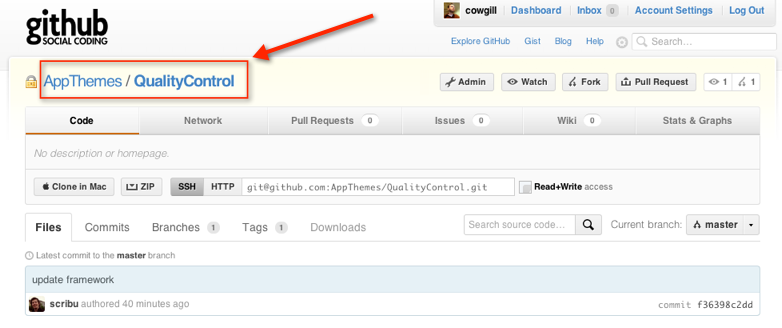
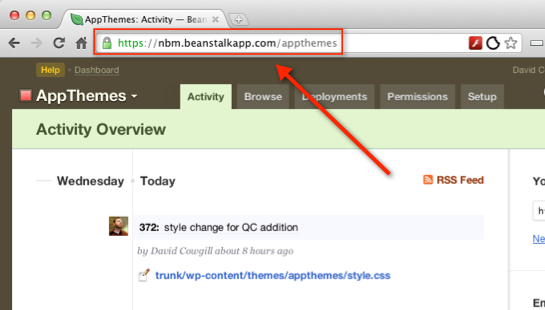
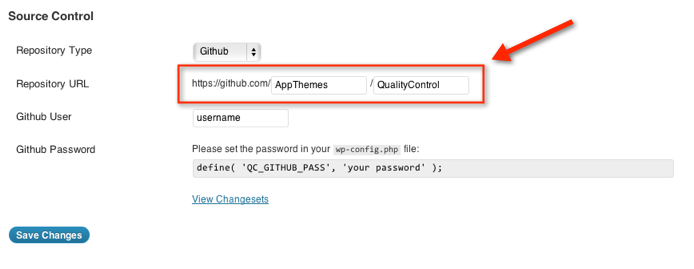
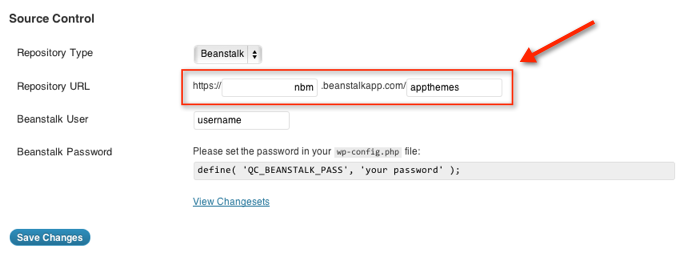
- Repository Type – QC supports GitHub and Beanstalk which are both leading cloud repository solutions. You will need to setup an account with one of them first before proceeding.
- Repository URL – Depending on which repo type you selected, you’ll need to enter the correct URL. See screenshots for Git example.
- GitHub/Beanstalk User – Enter the username you wish to connect to the repos. This is usually just your regular username that you login with. Some may wish to setup a dedicated user account (i.e. qcuser) instead.
- GitHub/Beanstalk Password – You’ll need to edit your wp-config.php file and paste in
define( 'QC_GITHUB_PASS', 'your password' );. Change “your password” to your actual password. The constant should be either QC_GITHUB_PASS or QC_BEANSTALK_PASS.
You can reference tickets from your commits, and a message will be posted on that ticket:
- “Working on stuff. See #7 and #11” will create a comment on ticket #7 and on ticket #11.
- “Finaly nailed this bug. Fixes #11” will create a comment on ticket #11 and also close it.
Now you’ll want to perform a test commit to make sure your repo integration is setup correctly.