Upgrading from 3.0.x to 3.0.5 is fairly straight forward for most customers. It’s important to note that v3.0.5 uses brand new features only available in WordPress v3.0 or higher. Do NOT install this version of ClassiPress if you have not yet upgraded your WordPress core to v3.0 or higher.
In v3.0.5 we are now using custom post types and custom taxonomies to handle your ads. This basically means that all your ads, ad categories, and ad tags will be kept completely separate from your blog posts. This is how it should have been from the beginning but WordPress had yet to support this until WordPress v3.0 came out.
So in order for us to take advantage of these new features we need to migrate all your ads, ad categories, and ad tags into this new module. Fortunately, we have built a migration script that will automatically take care of this for you. The script is built into v3.0.5 and you will be prompted with instructions once you install it.
Here are the steps to upgrade your ClassiPress site to v3.0.5:
- Login to your account to download ClassiPress 3.0.5.x
- Extract the .zip bundle to your desktop. Inside you will find the “classipress.zip” file.
- Login to WordPress and put your site in “maintenance mode” (download plugin) to take it offline from the public (optional step).
- FTP into your account to backup your current “classipress” theme folder by renaming it to “classipress_304”. You will find it usually in “/public_html/wp-content/themes/” or wherever your install is located.
- Now upload the new “classipress.zip” theme folder to your site via the install themes feature (http://www.yourdomain.com/wp-admin/theme-install.php?tab=upload).
- Activate the new theme that was just installed (make sure it’s 3.0.5.x and not your old 3.0.4 one).
- Go to the ClassiPress admin dashboard. There should be a big yellow message box with instructions on how to run the migration script. After you read through it and everything looks ok (and you’ve backed up your database), click the “run script” button. It will go through all your ads, ad tags, & ad categories and migrate them over.
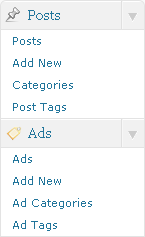
- To confirm that everything has been migrated over correctly, go to your new “Ads” section (see image above) and you should see everything listed there.
- IMPORTANT: You must now re-save your permalinks before your site will work properly! If you skip this step, you will likely get 404 errors (page not found) which result in broken pages. To re-save your permalinks, go to “Settings” => “Permalinks” and click the “Save Changes” button. This will flush your rewrite rules and update them to work with this version of ClassiPress.
- Go to “Appearance” => “Widgets” and make sure your widgets are there. If not, you will need to add them again.
- You will notice a lot of new options and tabs which gives you more control over your site. Get yourself comfortable with them and read the tooltip (? icon) for details about each option.
- Visit your site and make sure everything looks ok.
- Turn off “maintenance mode” and you’ll be back in business!
Also since this version of ClassiPress now includes a new user registration email template, you should disable any plugin that was previously doing this (if applicable). For more details on configuration and new options, please read the general install guide above. For any support-related questions, please post them in our support forum.