ClassiPress uses custom taxonomies to manage ad categories and ad tags. This keeps everything related to your ads completely separate from your blog posts which makes things much easier to manage.
Creating Ad Categories and Ad Tags allow similar advertisements to be placed together. In turn your customers can use these categories to better find what they are looking for. When you install ClassiPress on your site, a ‘misc‘ category is already created. The categories you create will depend on the style of the site you are creating. For example, if you own a site where you hope to have clothing advertisements some of your categories may be titled: ‘Mens Clothing‘, ‘Womens Clothing‘ and ‘Childrens Clothing‘.
Locating the Categories and and Tags Menu
There is one menu for creating Categories and one menu for creating Tags.
- Click on the Ads menu.
- Under Ads, you will see one menu titled Categories and one menu titled Tags.
Setting Up Ad Categories
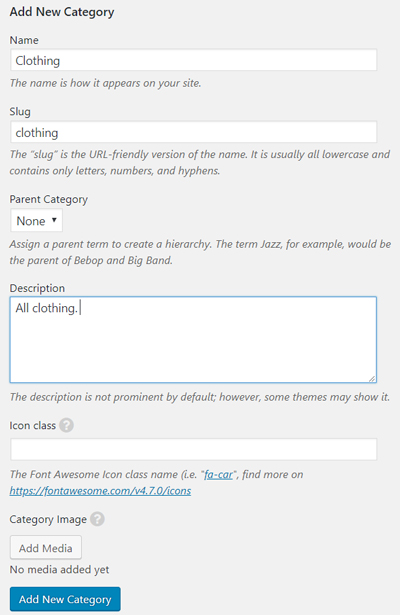
Once you click on the Categories menu, you will be taken to a page where you can create a new Ad Category. Also on this same page you can see the list of Categories that you have previously created.
To Create a New Ad Category:
- Give your category a Name.
- Give your category a Slug (a slug is a URL friendly version of the name).
- Give your category a Parent Category if appropriate. For example, Clothing would be a parent category for T-Shirts.
- Give your category a Description (this is not mandatory).
- Add an Icon Class and Category Image if you wish.
- Once you have completed the Ad Category, click the Add New Category button.
Setting Up Ad Tags
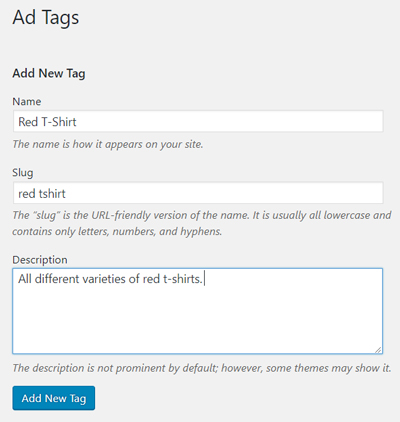
Once you click on the Tags menu, you will be taken to a page where you can create a new Ad Tag. Also on this same page you can see the list of Tags that you have previously created.
To Create a New Ad Tag:
- Give your tag a Name.
- Give your tag a Slug (this is a URL friendly version of the name).
- Give your tag a Description.
- Once your tag is complete, click the Add New Tag button.
Giving your Ad a Category and Tag
When a user creates an advertisement from the front end of your site they will be able to place this ad in a category of their choosing. This is one of the first drop-down menus when a user creates an ad. This drop down category menu is shown in the example below.

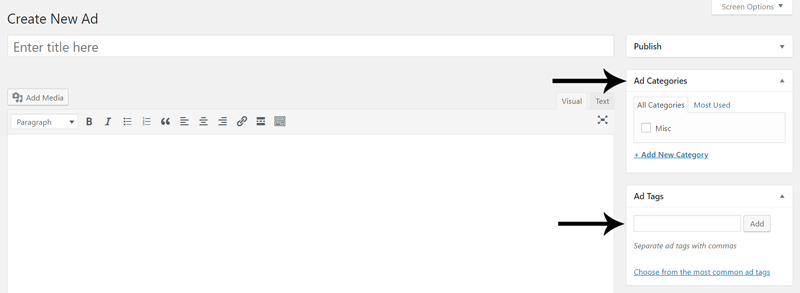
When admin creates ads from the back end of the site they can simply apply tags and a category from the right hand side of the Create New Ad page. The location of the ad categories and tags is shown in the example below.