The ‘Custom Form’ feature is built into all of the AppThemes (except for ClassiPress which has the it’s own form builder). The Custom Form Builder allows site owners to customize the information for business listings on their site. This feature allows you to achieve advanced customization on your website.
The ‘Custom Form Builder’ enables you to add new fields to the already existing fields (title, description etc). You can then make these custom forms, category specific.
In this documentation I have used Vantage although note that form builder is available on other AppThemes.
Usage Example of the Form Builder Feature
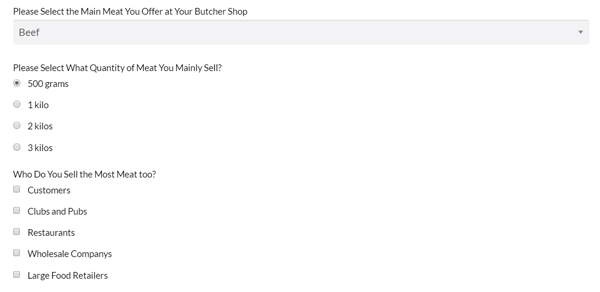
Location of the Custom Form Builder
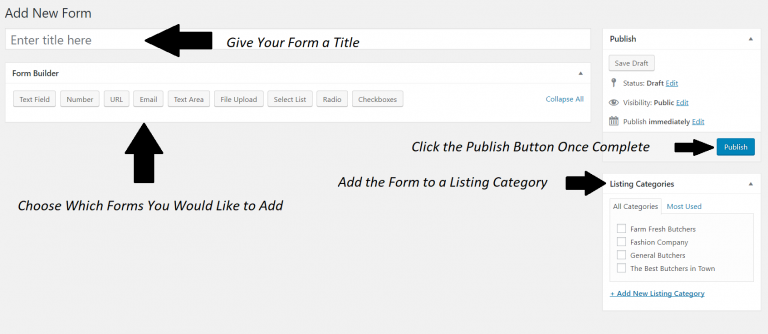
The Form Builder is located in the ‘Add New Form’ and ‘Edit Form’ interface.
- Click on the ‘Forms’ menu and then on ‘Add New’.
- You will see the ‘Form Builder’ below the title field.
- Create a form to ask your customers or visitors an array of questions specific to their business, occupation or needs. The options are endless when using the ‘Custom Form Builder’.

Using the Custom Form Builder
Title
Start by giving your form a title. The title of the form is for internal use so you can distinguish between the forms you have created.
Listing Categories
Select which category this form applies to. Read more about assigning the form to a category below.
Select Options from the Form Builder Button Bar
- You will see a range of button options that you can add to your form. Click on the button that you would like to add.
- A new field block will appear after clicking on each form builder button. This is where you will enter in any information relating to that field.
- Selecting the ‘Required’ checkbox makes that field required by your customers. They will not be able to proceed until they have answered the field.
- You can drag and drop each field. The order they show in the form, is the order they will be shown to your customers.
- Once you have completed your form, click the ‘Publish’ button.
Definition of Each Basic Form Builder Button
Here is where you can find the definition of the nine main form builder buttons. This will help you to configure your own fields.
Common to all Fields:
- In the text field, the ‘#’ contains information about the field type and the meta name (this will be empty until the form is saved).
- Required- Select this box if you would like to make this a required field.
- Label- This is where you can enter in the name of your field. Your customers will see this on the front-end.
- Tooltip- A field where you can enter in extra information for your customers. For example, information on how they can fill out this field.
Text Field- A Regular Text Box
A field that you can use to gather text answers from your customers.

Number
The number field is similar to the text field although is used to gather numbers from your customers. Their response is limited to numerals only. This field is used to obtain information such as telephone numbers.
URL
This field is used to obtain URL’s from your customers. It will require a valid URL.
Use this field to gather your customer’s email address. A valid email address will be required.
Text Area
This is a regular text area field. Depending on the version and theme that you are using it may contain an editor type control that allows you to display the text area as a HTML editor.
File Upload
This field is used to allow customers to upload files.
- Allowed Extensions- This is where you can specify which files you wish for your customers to upload. Simply type them in, separated by a comma. For example: ‘pdf, doc’, will allow your customers to upload pdf and doc files.
- Additional Controls- These controls are dependent on the version and theme you are using. File Limit, Embed Limit and File Size allow you to dictate the number and the size of the files your customers can upload.

Select List
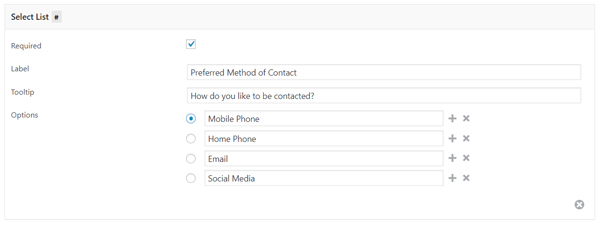
This allows you to create a list of options that your customers can choose from. Clicking the ‘+’ allows you to add an option and the ‘-‘ allows you to remove and option. Checking any of the list choices will make this the default option on the front end (pre-selected).
Radio
The ‘Radio’ field has the same options as the ‘Select List’ field.
Checkboxes
Allows you to create a list of items that your customers can check if it applies to them. Clicking the ‘+’ allows you to add an option and the ‘-‘ allows you to delete and option. Checking a box will show up as the default option on the front end (pre-selected).
Assigning the Form to a Category
Once you have created a form using the ‘Form Builder’ feature, you can assign it to a category. This way, only customers that this category applies to, will be able to fill in the form you have created.
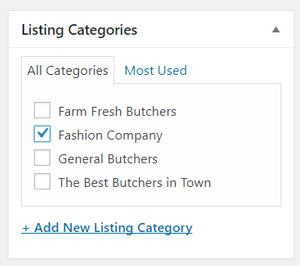
For example, if I created a form with questions that related only to fashion businesses, then it would make sense to place this form under the ‘Fashion’ category. Now only people with fashion businesses will be shown this form with questions that relate directly to their business.
- To add your form to a category, locate the ‘Listing Categories’ section. This section can be found on the right hand side of the form page.
- Select the box next to the category you wish to add your form to.
- ‘Update’ the changes you have made.
- Now when a customer proceeds to create a listing on your website, if they choose that category, they will be shown the extra details from the form you have created. This ensures that the form is only shown to customers that it applies to.
Deleting Fields from the Form
To delete a field from your form simply click the ‘x’ in the right-hand corner of the field.

Like this tutorial? Subscribe and get the latest tutorials delivered straight to your inbox or feed reader.

