One of the difficulties in starting a business directory website is getting valuable and useful data. You would love to grab all the data you need organically through user submitted listings but that’s a process that could take a very long time. On the other hand, you could add the data yourself but then you cheat yourself out of potential revenue from selling listings on your site.
Problem Solved
Well, Vantage has a great feature that’s going to help you solve this problem. The “Claim a listing” feature lets users claim a listing on your site as their listing. Better yet, when they claim a listing, they are prompted to pay for the listing just as if they created it themselves.
So go ahead and add all the listings you want to your business directory. You can enter very basic data and then prompt business owners to claim their listing so they can take control of it and add the data that will be valuable to them.
Now that you understand the basic value behind claimable listings, let’s take a look at how they work.
Where Do You Get All that Data?
This one is up to you. You could enter all the data yourself. For example, if you’re creating a business directory for your town, you could add local businesses manually. If you’re adding only the very basic data, this might be easier than it sounds.
What about getting data from other sources? Perhaps the local chamber of commerce or business development organization has this available. Maybe you’re getting a data from a third party service that specialized in regional business data.
Regardless of how or where you get your data, it’s the first thing you need to do. Once you get the data, you’ll be able to mark individual business listings as claimable.
Make a Listing Claimable
This is the easiest part of the process. It’s so simple that you can do it in about a minute. First, choose any existing listing in the WordPress admin. You can find all listings by going to “Listings” in the sidebar admin menu and then clicking the listing of your choice.

This will take you to the “Edit Listing” page. Scroll all the way to the bottom to find “Claimable Listing”. If you don’t find “Claimable Listing”, scroll back to the top, click “Screen Options” in the top right hand corner and make sure “Claimable Listing” is checked.
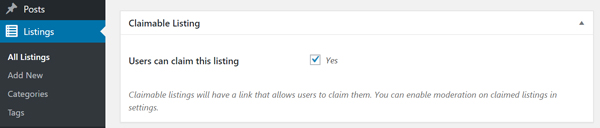
After you find the “Claimable Listing” panel, simply check the “Yes” box next to “Users can claim this listing”.
Now scroll back to the top of that page and click the blue “Update” button. That’s it! The listing is now available to be claimed.
New Listings
If you’re creating a new listing, you can follow the exact same process to make it claimable. Also, when importing listings, there is an option to ‘Mark All as Claimable’ in the importer.
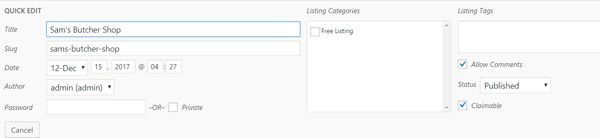
Quick Edit
As you can see in the screenshot below, you can also mark a listing as claimable in the “Quick Edit”.
How Does it Work When a Someone Claims a Listing?
So you’ve marked several listings on your business directory as “claimable”. What happens when a business decides to claim that listing. Here’s simple example to show you what happens.
In our example, we added Sam’s Butcher Shop and made the listing claimable. We just sent Sam the butcher an email and invited him to view his listing on our site. Sam checks the listing for his business and sees the following.
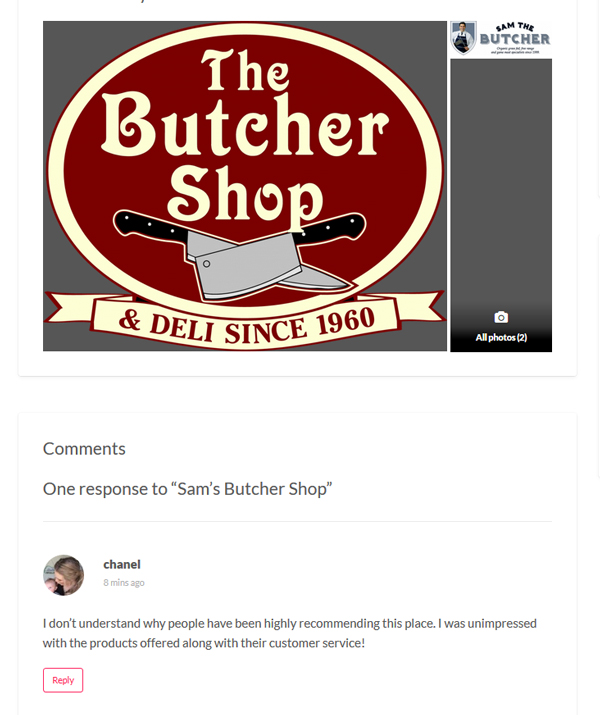
Well, Sam would love to add his website address, phone number and more. He would also like to add images to show off his business. And what’s more, he’d like to respond to that bummer review. Sam decides that he’d like to own the listing so he clicks the “Claim Listing” button. This leads him to a confirmation page.

After Sam confirms that he wants to claim the listing, he is taken to the pricing page. At this point, it’s just like purchasing a new listing. Sam’s pretty confident about the site and likes the price for the unlimited listing on the Super plan.

Once he clicks the “Continue” button, he’ll be passed off to the payment gateway. After finishing his payment, the listing goes into pending mode.

Approving the Claim
Sam has claimed the listing and made his payment. This puts the listing into pending status. Although he can see the listing in his dashboard, he cannot edit the listing. You will need to approve the claim in order to make the listing active.
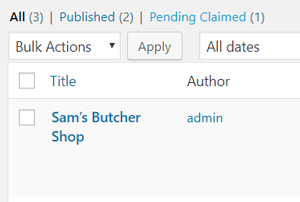
Vantage makes it easy to find pending claimed listings. You simply go to “Listings” in the WordPress admin. At the top of the listings admin page, you’ll see a link for “Pending Claimed”. Click this link to see all the claimed listings that are pending.
The pending claims will also show up on the sidebar once you are in the ‘edit view’ of that specific listing. You can choose to accept or reject the claim.
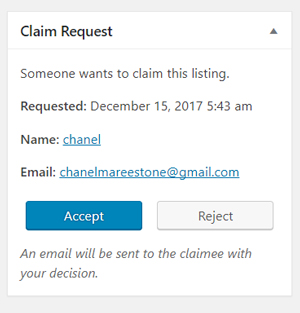
To get to the screenshot above, you can click the “Quick Edit” link on any listing. If you approve of a claimed listing, just change the status to “published” then click the “Update” button. The listing is now active and it has been assigned to Sam.
The Listing Has Been Claimed!
Sam can now edit his listing, add images and more contact info and he can fill out the description. Best of all, Sam can respond to that one review. Sam’s a happy camper.
Additional Notes About Approving
Vantage does not supply any tools to help you confirm that any user claiming a business listing is the owner of that business. While a feature like this would be very useful, it would also be very difficult to build and wouldn’t always be reliable. It’s completely up to you to determine whether you should approve a claimed listing.
You can also change the moderation settings in Vantage so that listings do not go into pending status when claimed. To do that, log into the WordPress admin then go to Vantage > Settings > Listing tab. Near the top you will see the option for “Moderate Claimed Listings”. Check “Yes” to moderate listings. If you choose not to moderate listings, any user on your site could claim any available listing without your approval.
Summary
With this tutorial, you can now add several claimable listings to your business directory website. Once claimed, users can pay for the listings (or get the listing free if you’re not charging) just like they were creating a new one. Now that you know how to do this, give it a try on your site.
By the way, Sam’s listing, here’s how it can look after he claims it. Notice how he can respond to that bad review? This is powerful stuff for you and your customers. Enjoy!

Like this tutorial? Subscribe and get the latest tutorials delivered straight to your inbox or feed reader.